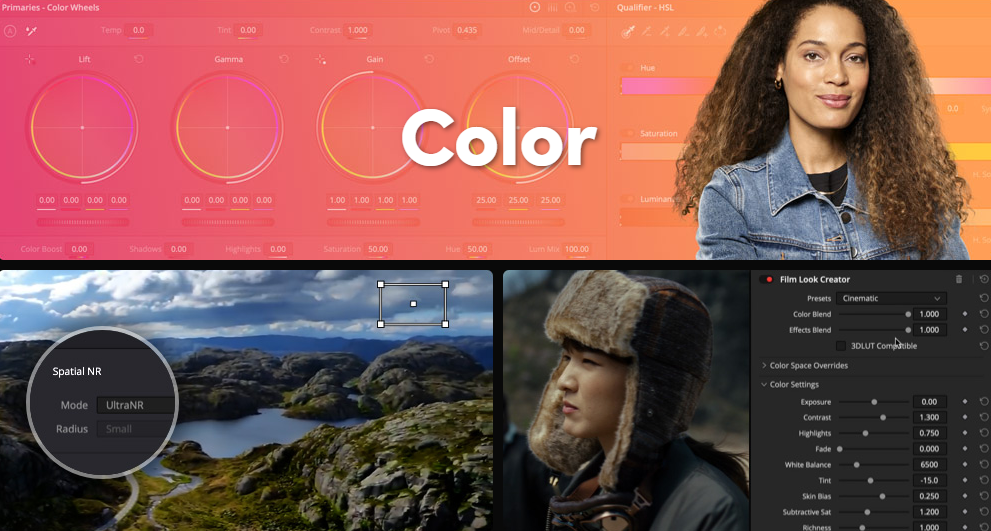
The continuous improvement of DaVinci Resolve has been noteworthy in the video editing and post-production industry. With the release of version 19, there’s a specific focus on the color correction tools, where the software continues to set new standards. In this article, we’ll explore the new features and important improvements introduced in the Color Page of DaVinci Resolve 19. From new tools to enhance video appearance to workflow improvements, this update promises to change how professionals work on the visual style of their projects.
Now, let’s begin by discussing the new “Color Slice” tool introduced in DaVinci Resolve 19.
Color Slice
6 Hue Vectores + Skin
We have seven vectors (red, green, blue, magenta, cyan, yellow and skin tone). Each of these vectors is associated with a range of the Hue parameter.

One of the big differences with curves is that it uses a Qualifier method to select the 7 vectors. In other words, each vector already has predefined HUE values, which for me is not the best method. And I’ll explain why.
Color Slice Hue Selection
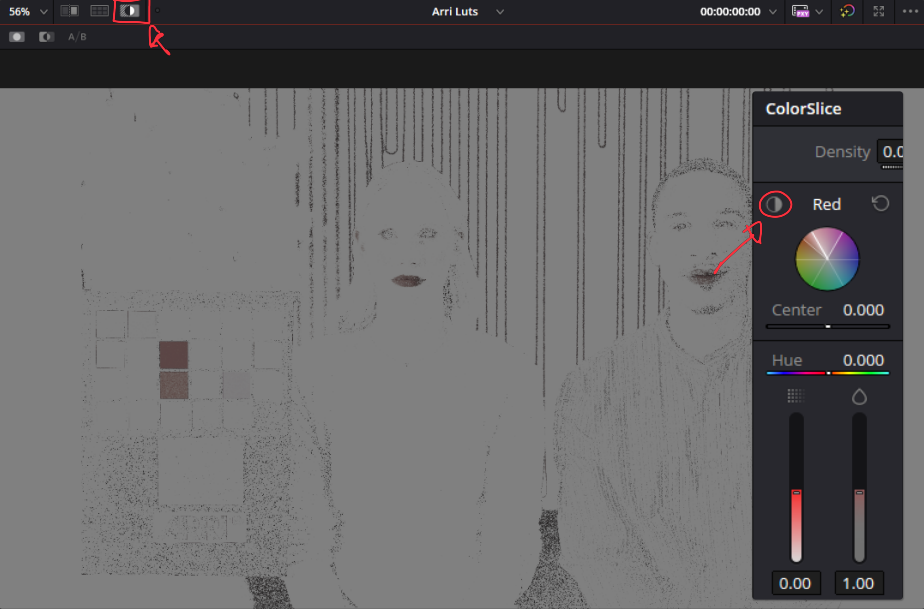
Like selecting only the reds in the qualifier and softening the mask, we get great results, but with this Color Slice slider, as of the date of this article, there are no finesse controls. If you overdo it, the footage will come out with artifacts and you can’t soften the qualifier. It only allows you to adjust the Hue Range. The Hue range doesn’t soften the mask.
Qualifier Hue Selection + Matte Finesse
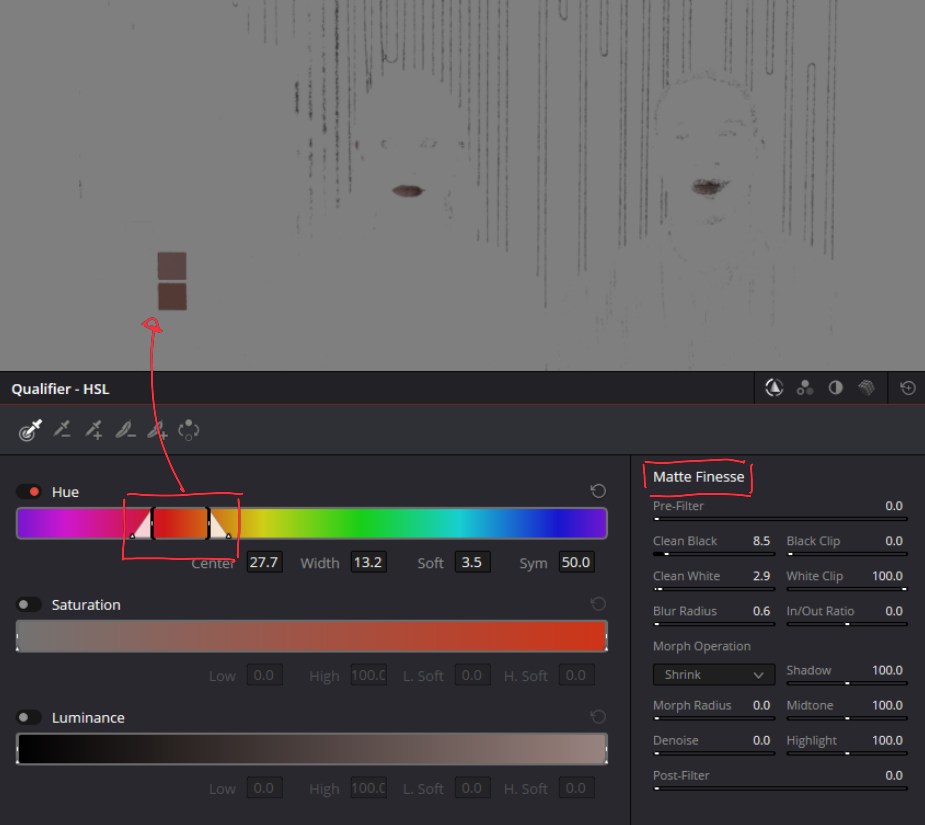
This is just my opinion of how the tool selects colors. Because in terms of new ways of enriching colors, such as density, I think we’ve made excellent progress.
Global Density

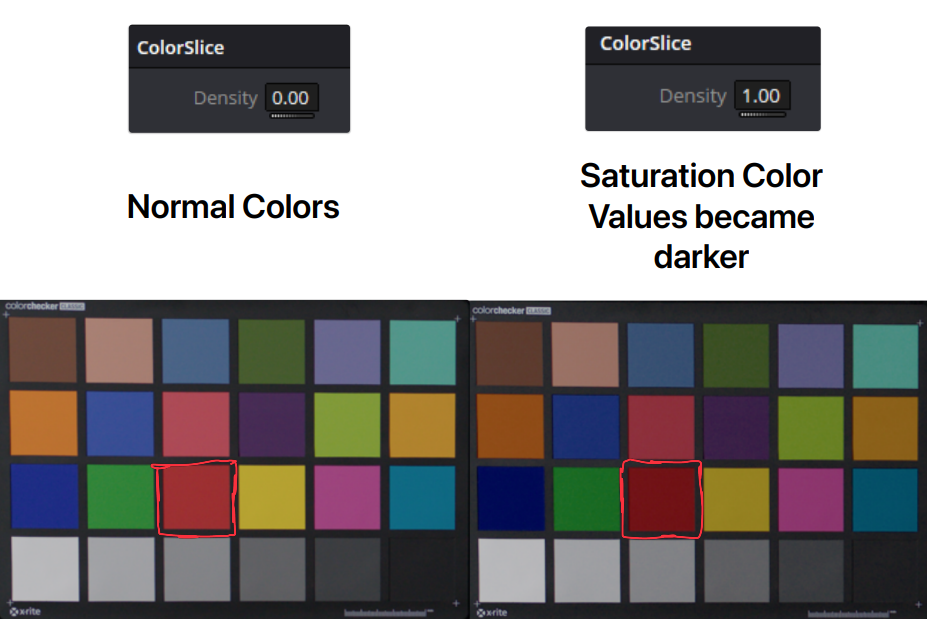
Density transforms richer and darker colors, giving the image a feeling of density. Usually, lighter, more saturated colors are associated with the video look and darker, richer colors are associated with film. The characteristics of film recording have been taken as references and are attracting more and more people to this type of look.
Ultra Noise Reduction (Studio Version)
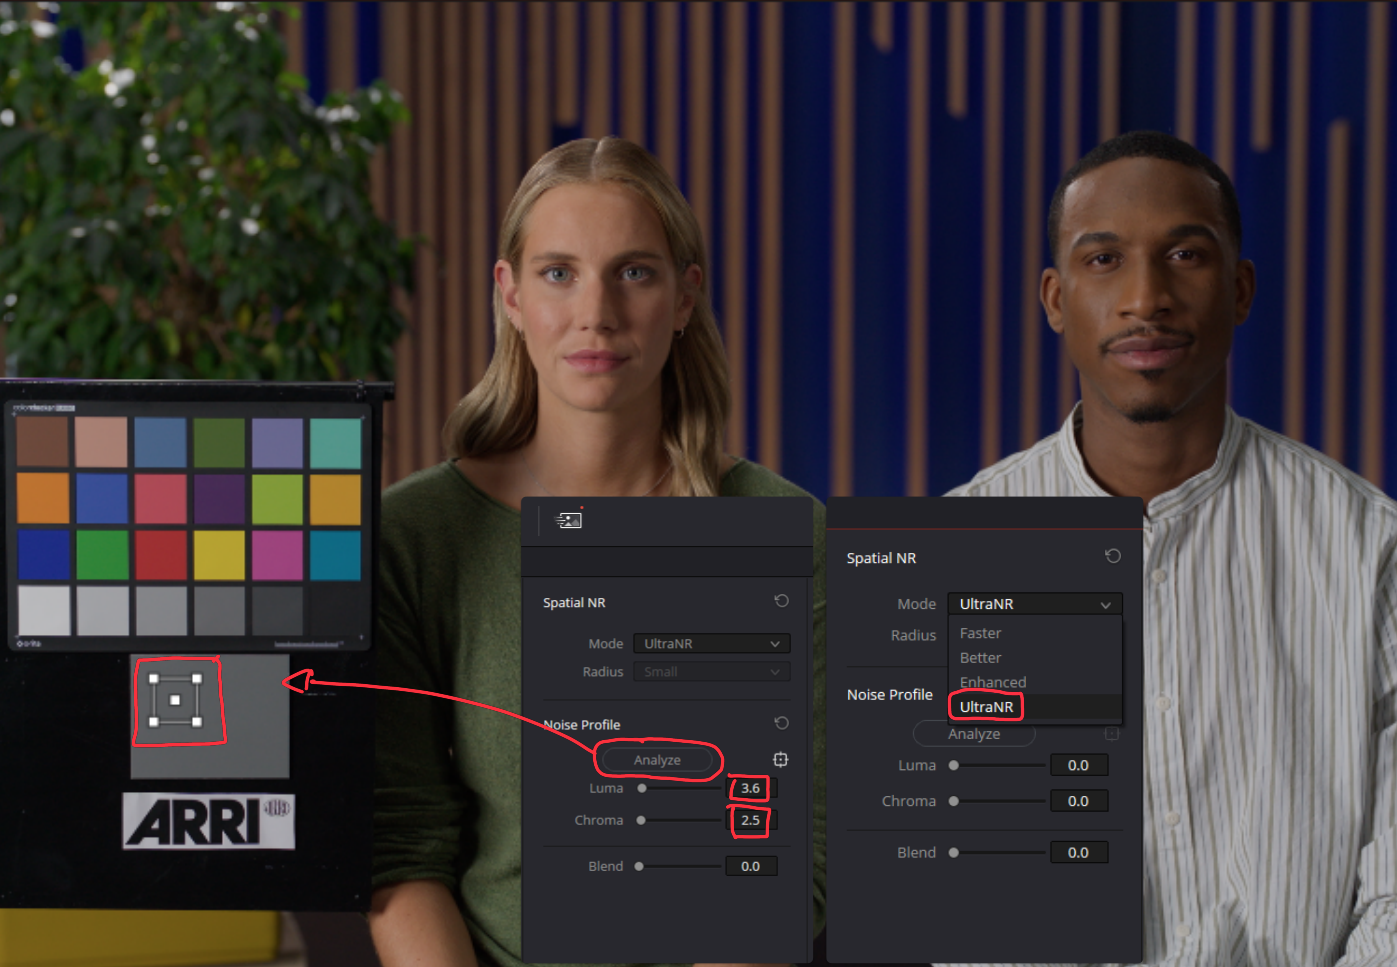
UltraNR is a noise reduction feature powered by the DaVinci Neural Engine within the Color page’s spatial noise reduction palette. It significantly reduces digital noise in frames while preserving image clarity. When combined with temporal noise reduction, it becomes even more effective in reducing noise in moving images.
This tool enhances the image noise reduction process by offering a more intuitive, faster, and easier method. Previously, in the industry, there was the Neat Video plugin, which automatically applied noise reduction after analyzing the footage.
To apply UltraNR:
1. Navigate to the Spatial NR tab and select the Ultra NR processing mode.
2. A new tab called Noise Profile it’s now available
3. Simply click the analyze button to initiate the analysis. DaVinci Resolve will automatically analyze the footage using the Neural Engine and calculate the luma and chroma values based on the selected area of interest.
4. If needed, adjust the analysis square to perform a new analysis.
Film Look Creator OFX
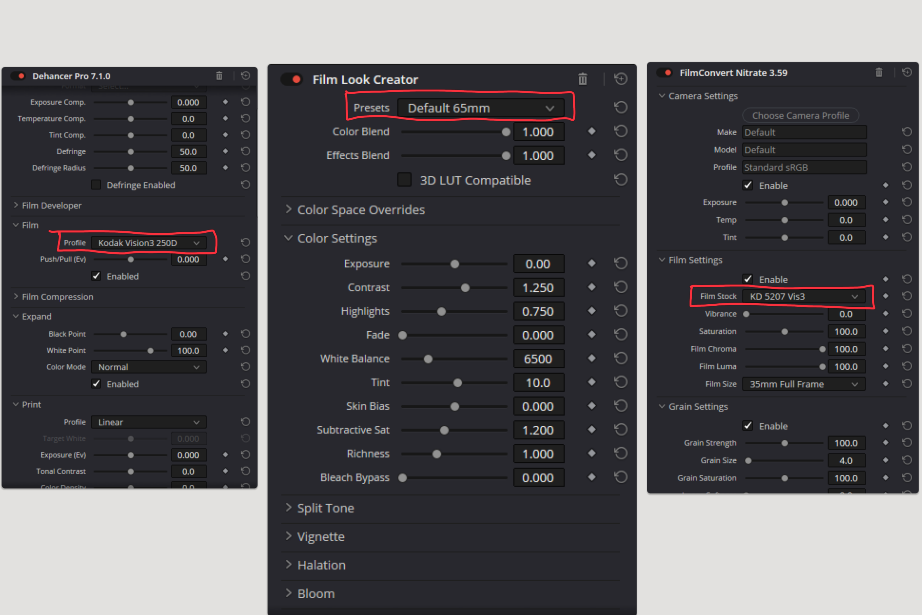
Unlike leading plugins in this field, this OFX does not rely on profiles that emulate different film types and their development processes. Instead, it simulates specific characteristics found in these films within the working color space itself.
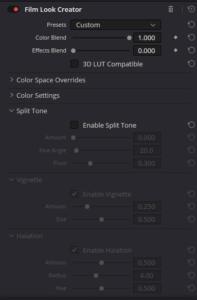
The effect is divided into two parts. Color parameters adjust primary functionalities like exposure, contrast curve, white balance, etc. Additionally, there are the characteristic film effects.
Users have the ability to adjust the intensity of these settings using the “Color Blend” or “Effects Blend” functionality. When dragging the Color or Effects Blend Slider to zero, it becomes easy to see which parameters are affected by these groups.
In my opinion, this effect is highly beneficial and significantly enhances efficiency when applying a film look, ushering in a new era where images can evoke a cinematic feel while preserving the richness of the digital world.
Node Stack Layers
Over time, professionals have increasingly turned to node trees to maintain consistency and efficiency when applying effects across different shots. With this evolution, massive node trees are becoming more common. However, the complexity of nodes can sometimes be a distraction for those who struggle to maintain discipline and consistency across their work. Therefore, in order to break tasks down into manageable steps, I believe that Node Stack Layers have emerged to maintain the complexity of node trees while visually simplifying the process, allowing for a quick and easy overview of various color grading processes or stages.
Primary adjustments, secondary corrections, power windows, qualifiers, texture, and more can now be compartmentalized into multiple layers, up to 4.
For me, this will be an excellent tool to organize everything in a way that maintains consistency and breaks down my work into manageable steps. Let me provide an example of how I could use this function:
Layer 1: Primary Corrections
Layer 2: Secondary Corrections
Layer 3: Power Windows
Layer 4:Texture
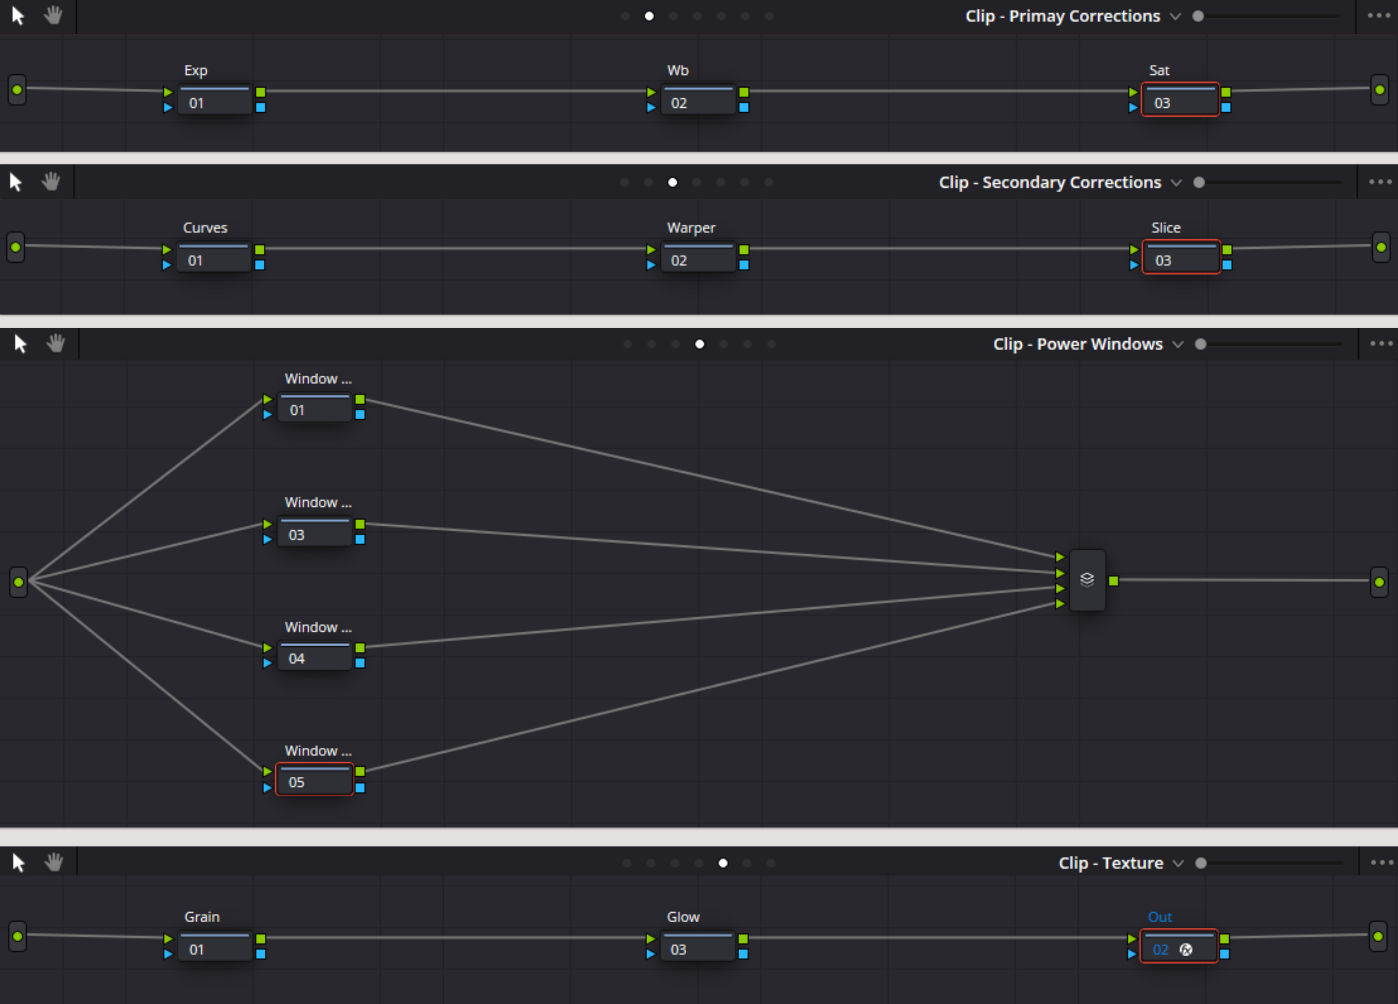
In each project, we can define in the Project Settings under General Options how many stack layers we want to use. We have the option to add up to 4 and rename them to something that makes more sense. The most interesting aspect of this functionality will be understanding how the software’s programming calculates all the data between stack layers.
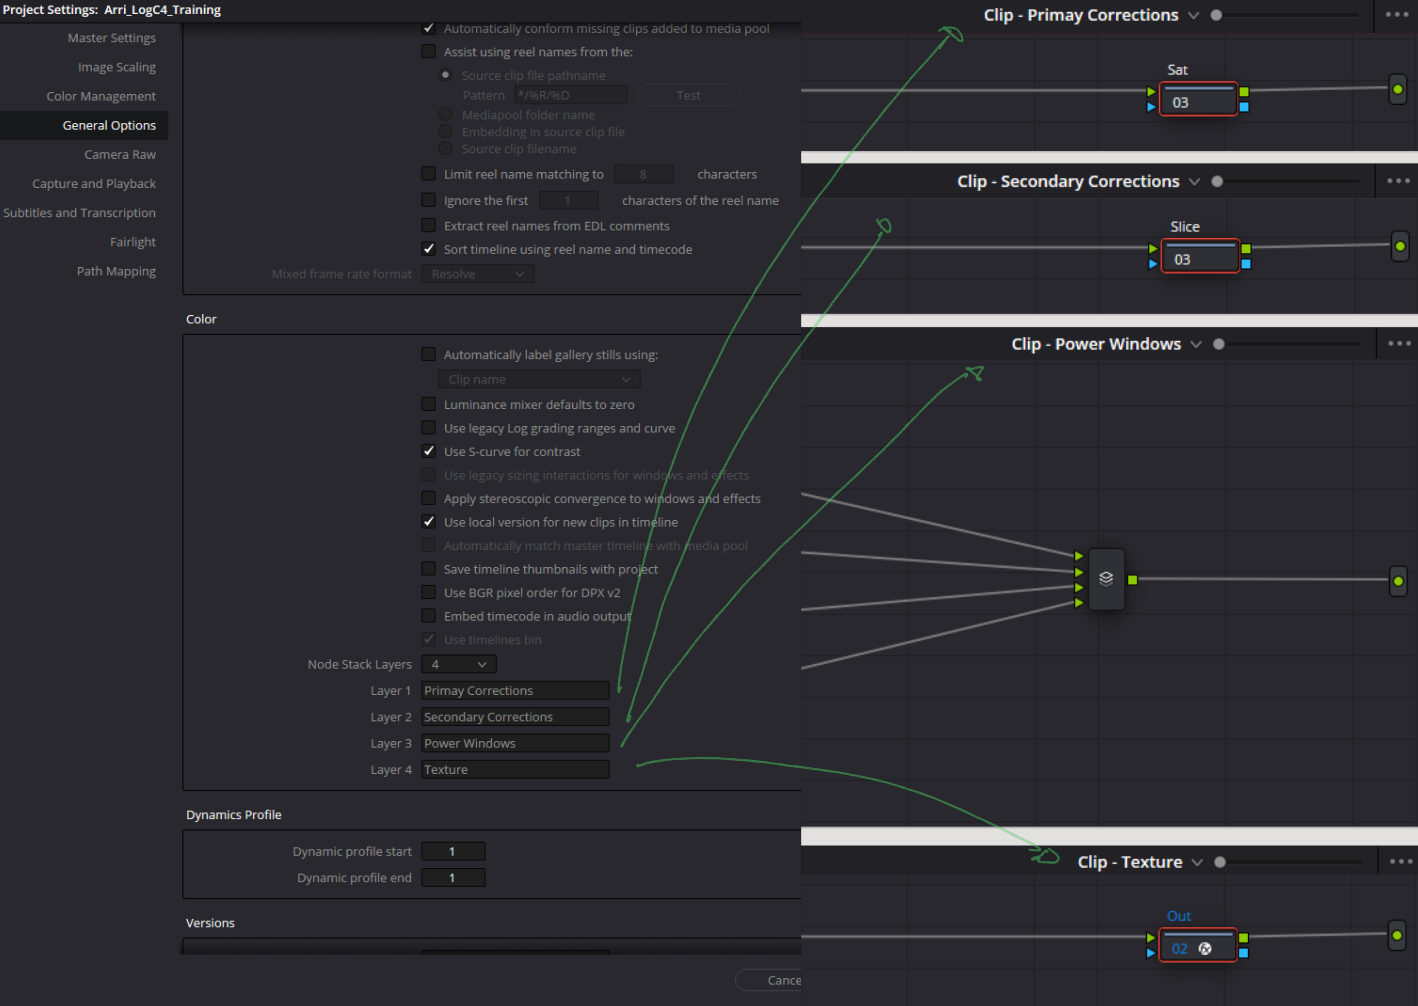
The main question is: Is the signal from the green box coming directly from the original footage or from the previous stack? This is a fundamental question that needs to be answered and tested because hue and saturation qualifications will yield complementary values, which can make selection easier or more difficult.
Considering that certain actions to achieve certain results must follow a specific order, and from my analysis, the same function as the serial node is applied between stacks one after the other.
Furthermore, a key consideration is that as we complete grading, if we deactivate the stack layers in the project settings, the grading within those stack layers will no longer be applied. However, the great advantage is that Davinci Resolve, even when not displaying the stack layers, retains the stored information in case we want to reactivate them.
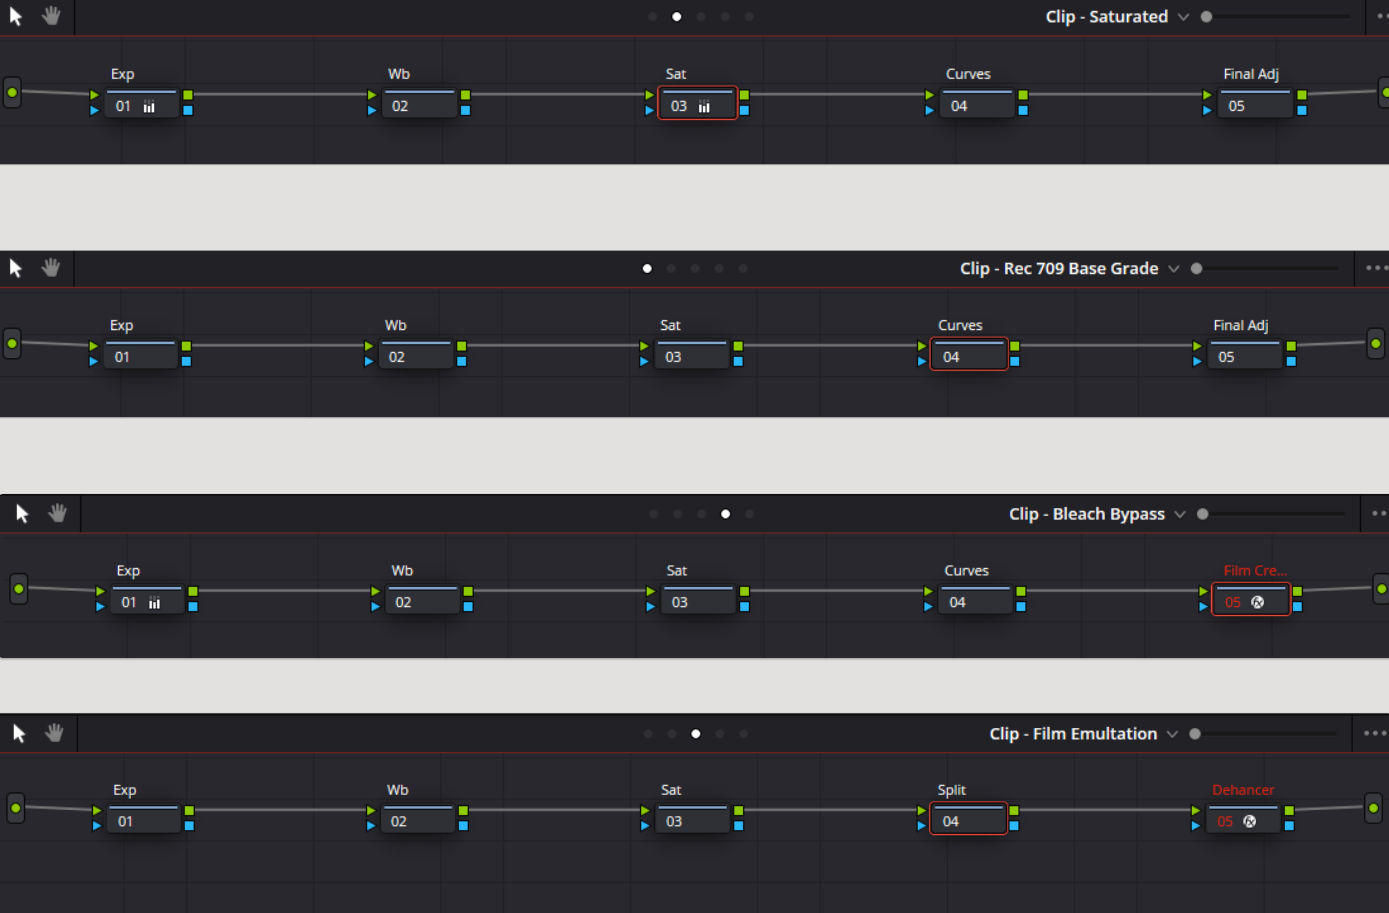
In my opinion, this will also be a great advantage for developing versions and looks in the early stages of the color grading process. By applying 4 different looks in each stack and activating/deactivating the stacks as needed, we can quickly analyze various types of looks.
Layer 1: Rec 709 Base Grade
Layer 2: Saturated
Layer 3: Bleach Bypass
Layer 4: Film Emultation
Copying and Using Apply Grade Between Clips: In my opinion, it becomes a bit more confusing and difficult. Let me explain:
Copy and Paste with Middle Mouse Click – I have always used this tool extensively to copy the grading from one clip to another or even to select all and copy the same grading. Now I find this task a bit more challenging because when using the middle mouse click to copy the grade and having the stack layers activated, it only copies from the active layer and does not copy the entire grading that the clip has and its respective layers. For me, this is not the best process because it forces me to first Grab Still of the same clip, then later select Apply Grade, which then applies all the layers.
Let me give an example with two ARRI LOG clips. The stack layers configuration is as follows:
Layer 1: Add Blue ( 1.50 gain blue )
Layer 2: Add Green ) 1.50 gain green )
My first clip: Essentially, my clip will have a Cyan grading ( Blue + Green )
Now let’s copy the grading from one clip to another. Both stack layers have adjustments. In Clip Number 2, I have the “Add Green” stack layer selected, and I click with the middle mouse button.
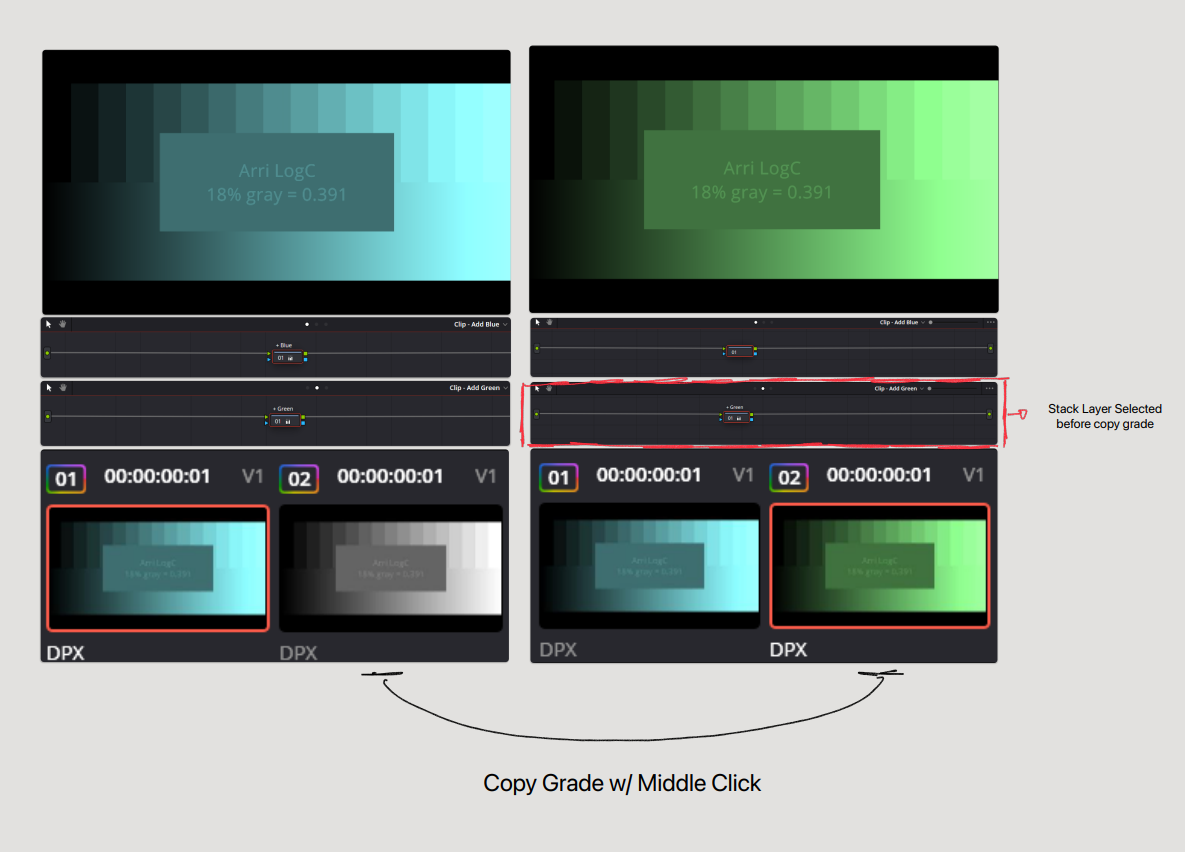
My second clip, which should have copied everything and turned Cyan, turned Green instead. It only copied the Stack Layer that was activated. Stack Layer ” Add Green”.
In my view, this doesn’t make much sense because it makes the process more difficult. Instead of one click to copy the grading from one to the other, now you have to make more clicks based on the number of stack layers.
The same thing does not happen if we use the “Apply Grade” option within the timeline or in the gallery.
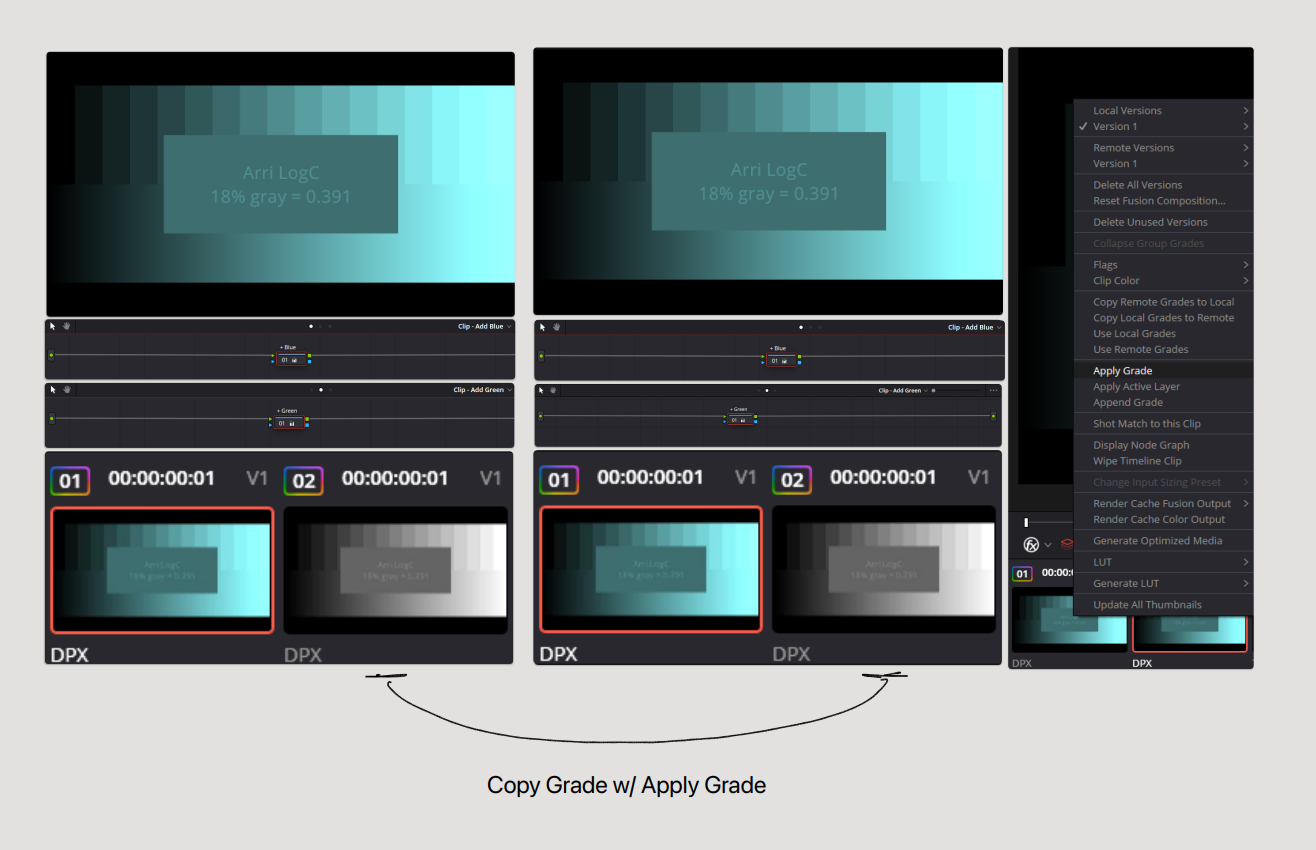
Blackmagic, please add a checkbox “Copy and Paste All Stack Layers” for us to use with the middle mouse button. This example highlights the issue, but with footage and small changes, sometimes it will be very difficult to tell if the change has been applied or not. Our brains are already programmed and accustomed to the middle mouse click applying the grading to the entire clip.
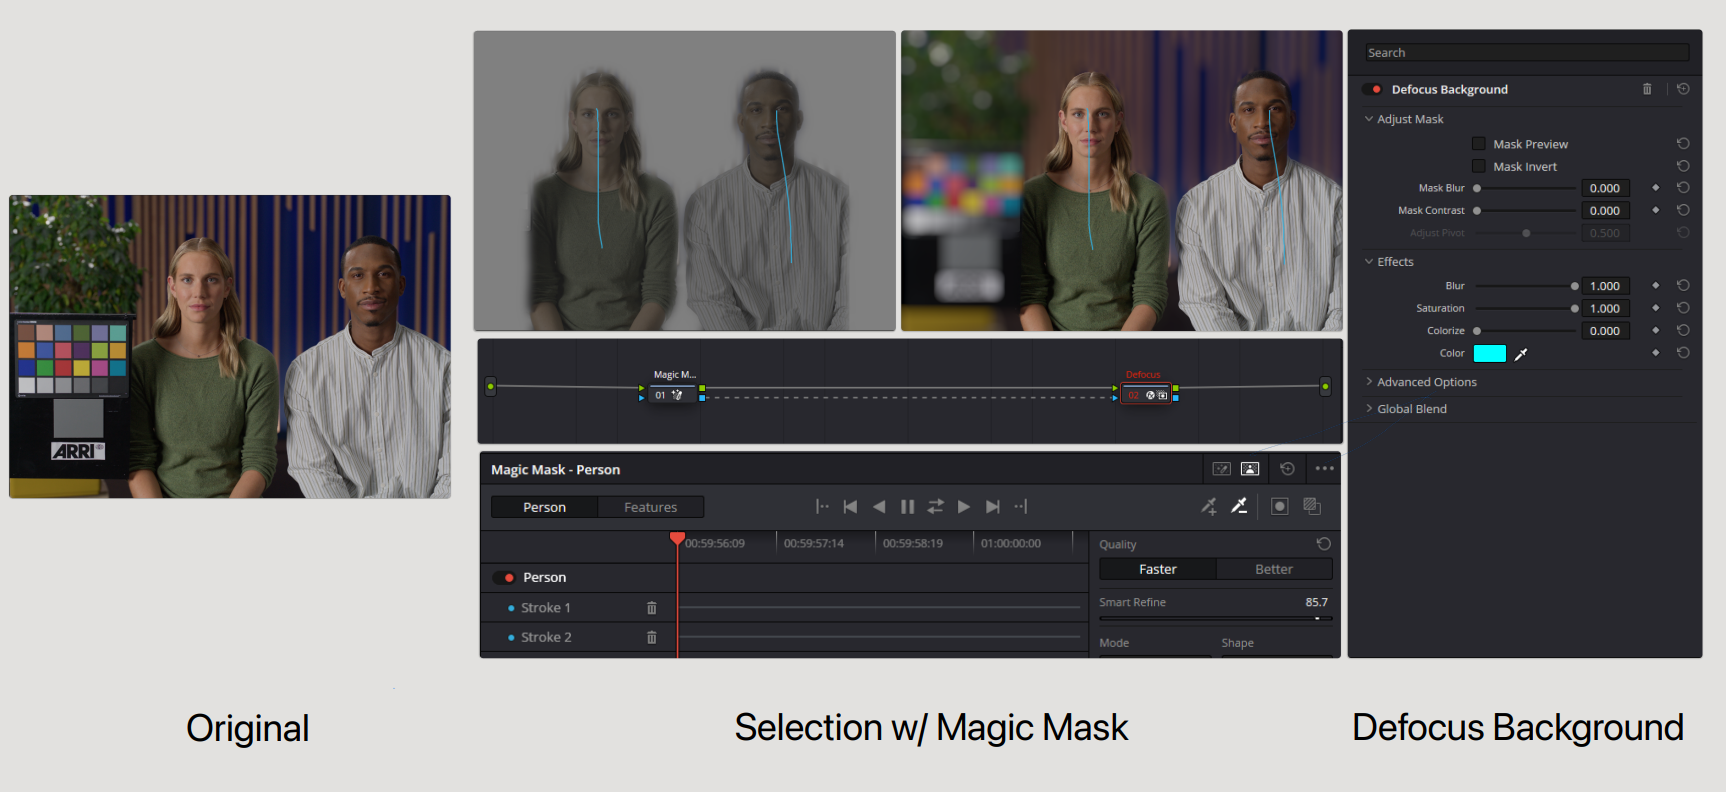
Defocus Background
This new OFX plugin allows for creating very interesting depth of field effects with just two nodes: one for selection and another for blur. There are always two modes of operation when it comes to blur: Lens or Gaussian.
In addition to blur, we also have the option to adjust the saturation of the background.
Overall, it will be a great tool for bringing elements or characters even more to the foreground.
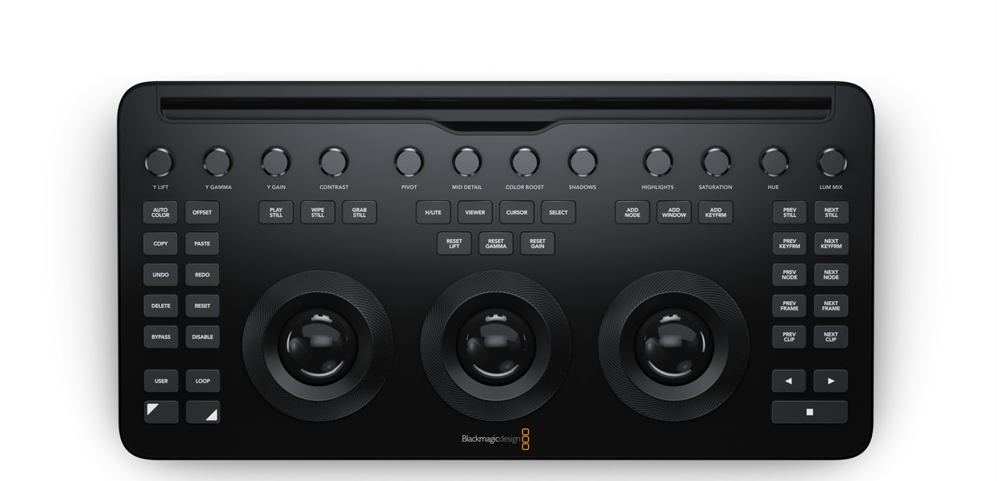
DaVinci Resolve Micro Color Panel
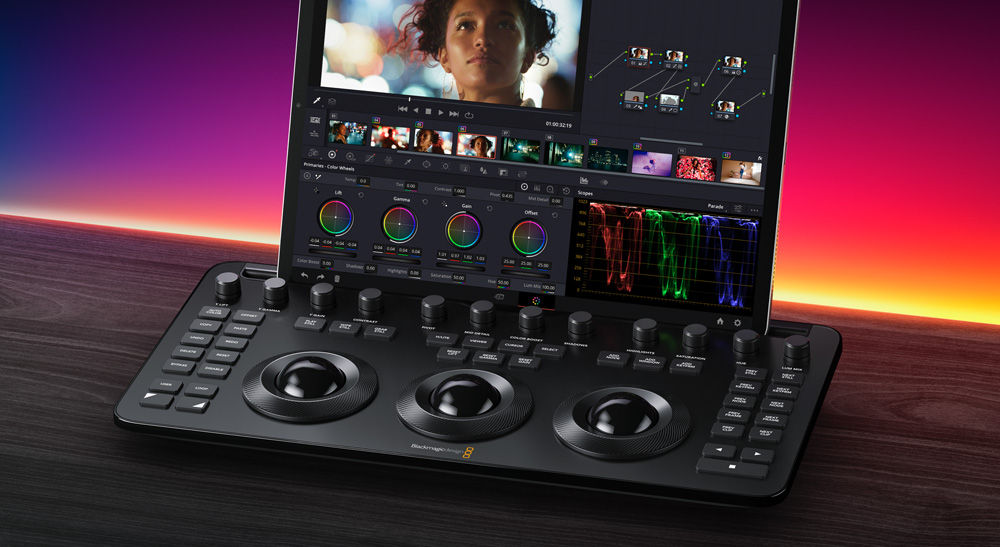
The new Blackmagic Design panel has arrived with several exciting changes. One of the standout features is the addition of Shift Keys, which expand the functionality similar to what is already available on the Advanced Panel. Another significant improvement is the availability of buttons in multiple languages, providing a more inclusive and enriching experience for users. This panel will be released in May with a price tag of around $495.
The design of this panel was also crafted with a new feature that allows for iPad integration on the rear, offering greater flexibility when using both software and hardware. This innovation enables colorists and content creators to work even in less conventional environments, making production possible in various locations.
One of the main disadvantages is that the Micro Panel no longer includes the DaVinci Resolve license.
https://www.blackmagicdesign.com/media/release/20240412-05
My notes
Overall, I found this new update to be a positive step in technology, particularly in the realm of video post-production, and of course, within the Color Page. As a colorist, I believe that Blackmagic continues to provide us with tools that truly allow us to shine in our craft. However, I also emphasize that sometimes less is more. While these tools offer excellent capabilities for exploring new ways to view an image and enable extensive post-production techniques such as blurred backgrounds, color adjustments, object removal, beauty enhancements, and more, they can also lead to over-manipulation of images over time, creating a digital aesthetic that may resemble images generated by AI. This can be a drawback if not used with caution.
These tools are excellent for problem-solving but can be detrimental when overused. With increased choices, the likelihood of error also increases.
From my perspective, how far can we go with layers upon layers of post-production on a digital image before we start distorting what photography truly is, rooted in historical and chemical processes?
I hope you enjoyed the article, and I’m always open to discussing these topics further or answering any questions.
Thank you, and until the next article,
Hugo Soares
Get Davinci Resolve 19 Beta
https://www.blackmagicdesign.com/pt/products/davinciresolve
- hugosoarescolorist@gmail.com
