Resolve Backups: A Detailed Explanation
Did you realize you missed something or made a mistake on your project? Or maybe you’re curious about Project Backups in DaVinci Resolve? Unlike other editing software that uses project files, DaVinci Resolve relies on a database system, which manages project backups in a different way. This can sometimes be confusing, especially since people are used to Auto Saves in other NLE software. In most NLE software, you can simply open a project file to recover your work. DaVinci Resolve works differently, and understanding how backups are tied to the database is key. But don’t worry—this guide will show you how to protect your work and be prepared for any issues.
Here’s what I’ll cover. You can click on the topics to jump to that section if you’d like!
Disclaimer: All topics and examples discussed here are based on DaVinci Resolve 19.1, as of the time this article was written. Future updates may modify certain details, and some features or options may change in later versions
By the end of this guide, you’ll know exactly how to safeguard your projects and never lose your work again!
What type of Backups are available?
In DaVinci Resolve, the types of backups available to protect your projects when working in a local disk database are:
- Local Database/Project Libraries Backups: This type of backup must be performed manually by the user and creates a backup of the entire database, saved as a single file with the extension “.resolve.diskdb”. If something goes wrong, you can restore the entire database.
- Project Backups: Once enabled, Auto Saves are generated automatically according to the save settings. If you make a mistake, you can restore Project Backups from the Project Manager to recover your project.
- Live Save: Every action performed in DaVinci Resolve, logged in the History, is automatically saved. If the project crashes, all actions will be preserved. However, once the project is closed, the history is deleted. This is the same History menu used for the Undo command.
- Timeline Backups: This feature automatically generates Auto Saves for timelines based on the save settings, allowing you to recover individual timelines, including backups of deleted timelines.
Below I’ll explain each type of backup in detail.
Database/Project Libraries Backup
How do you Back Up Your Local Disk Database / Project Libraries?
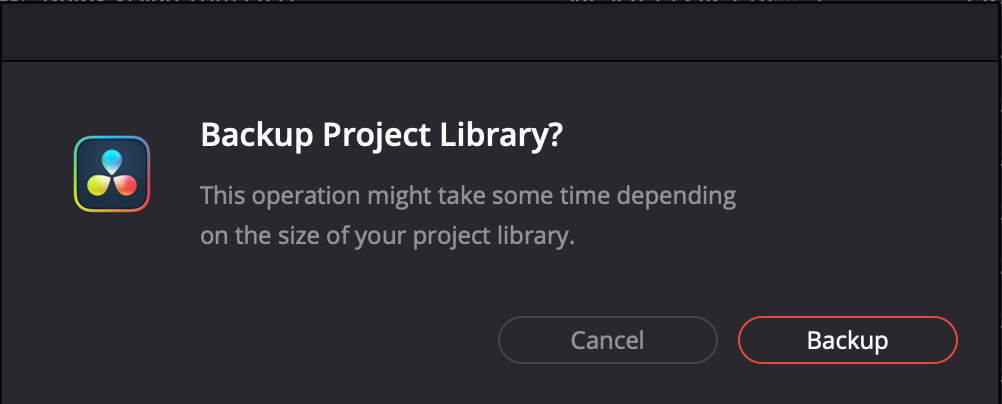
One of the best ways to keep your entire database safe is to export a backup as a single file. As soon as you export it, you will be able to save a file with the .resolve.diskdb extension, which means your database is backed up in that file.
To back up/export a project library:
- Go to the Project Manager (little home icon in the bottom right corner, or press Shift + 1).
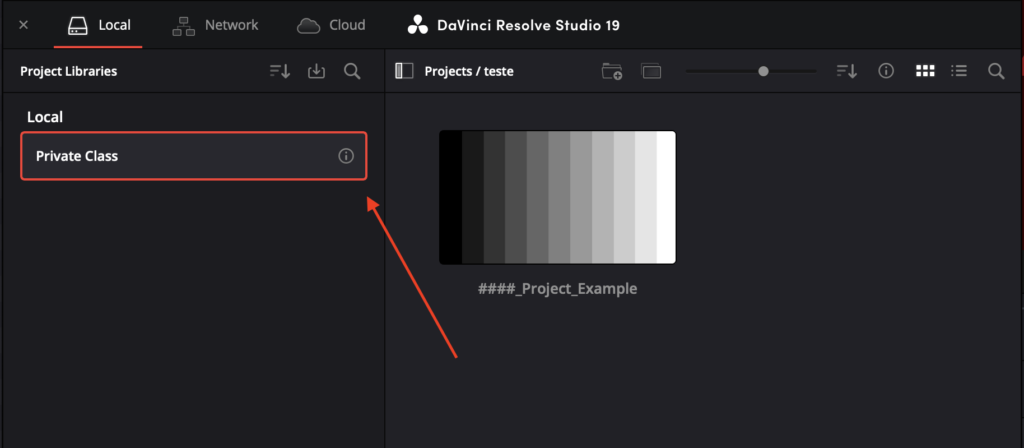
- Go to the Project Libraries, located on the left side of the Project Manager. DaVinci refers to the databases as Project Libraries.
- Select the Database/Project Library that you want to back up.
- Click the Display Project Library Details icon (the circled letter ‘i’ to the right of the project library).
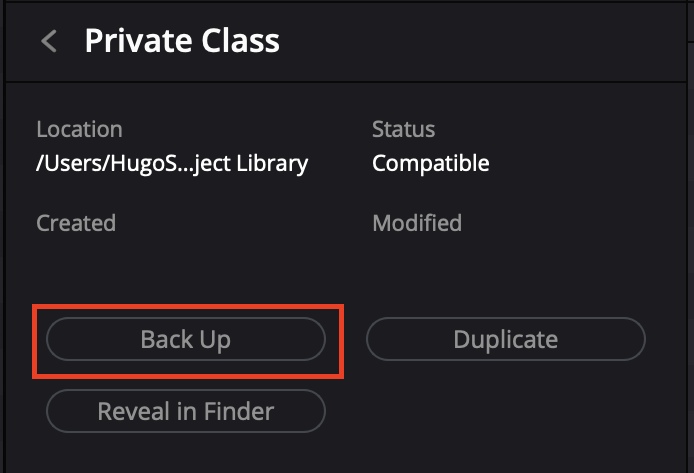
- Then, select the Back Up button.
- Choose a location to save the backup and click Save.
- A message saying “Project Library Backed Up Successfully” will pop up when the database is exported correctly.
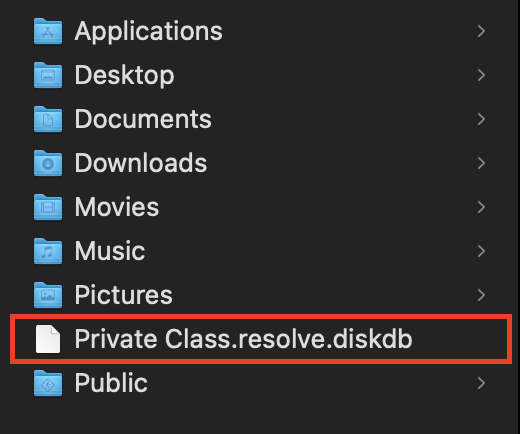
In Finder or Windows Explorer, navigate to the location you selected to save the file. The backup file, named yourdatabase.resolve.diskdb, will be stored there. Keep this file secure, as I will explain later in this article how to restore it. Saving this file preserves the progress of the project at the time the backup was created. However, if you continue working on the project, the backup will not update automatically. Try to keep in the habit of backing up your database regularly, at least every two weeks.
At the bottom of this chapter, you can watch a quick video tutorial to understand how to do this!


How do you Restore Your Local Disk Database or Project Libraries?
If you already backed up your database earlier and now it’s time to import or restore it, the backup file you exported will be fixed to the time you exported it. So, be careful when restoring the database to recover a project, as you might get confused about which database is the most up-to-date. When restoring the database—if it’s only temporary to recover something—I recommend adding ‘_Backup’ to the front of the name.
To restore your database, you need to:
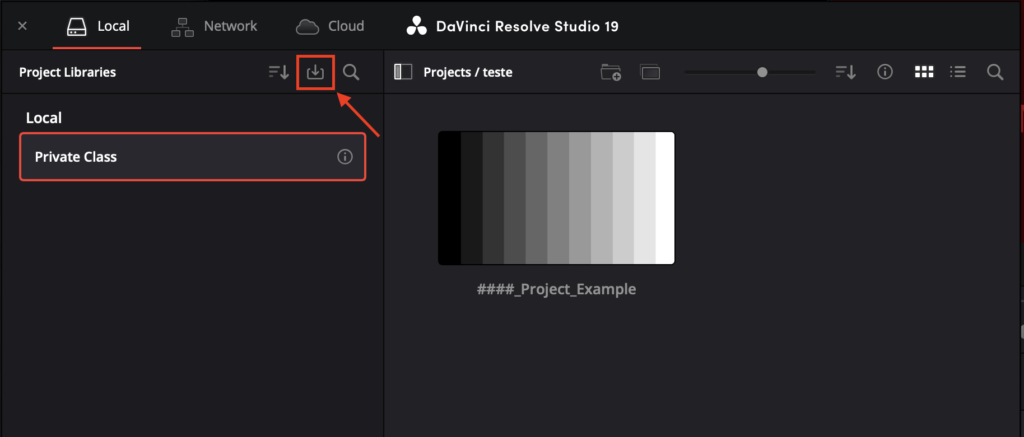
- Go to the Project Manager (the little home icon in the bottom right corner, or press Shift + 1).
- Click the Restore button at the top of the Project Libraries sidebar.
- Then, select the file you backed up with the resolve.diskdb extension.
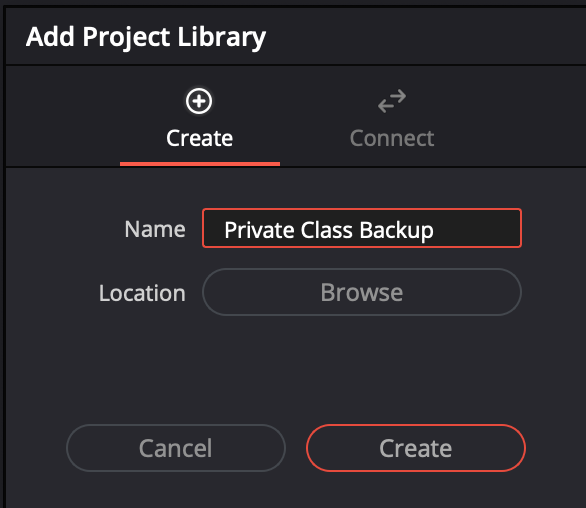
- Type the name you want your database to be called in this import.
- Select the Location where you want to create the new database.
- Click Create, and the imported local project library will appear in the Local section of the Project Libraries sidebar.
At the bottom of this chapter, you can watch a quick video tutorial to understand how to do this!
Auto Project Backups
What are Auto Project Backups?
Project Backups serve as a safety net during the editing process, allowing you to revert to previous versions in case of crashes, unexpected issues, or human error. However, it’s crucial to understand how they work in DaVinci Resolve.
Unlike permanent saves, project backups function like an “Auto Save” system. They are automatically managed and eventually deleted based on your Save Settings. I will explain the save settings in detail later. With DaVinci Resolve open, go to Preferences > User > Project Save and Load > Save Settings to access this. If you assume backups are stored indefinitely, you might run into issues down the line.
Key points to consider:
- Project backups are not enabled by default in DaVinci Resolve. Refer to the next chapter to learn how to activate them.
- Project backups are not saved forever. They are automatically erased based on the save settings you configure.
- Deleting a project from the database will also erase all of its project backups.
Stay with me, and I’ll explain everything in detail.

How do you Activate Auto Project Backups?
Some people only realize the importance of project backups when something goes wrong, prompting them to search for ways to back up their projects. However, it’s important to note that project backups are not enabled by default. To avoid potential issues, you need to activate this feature manually.
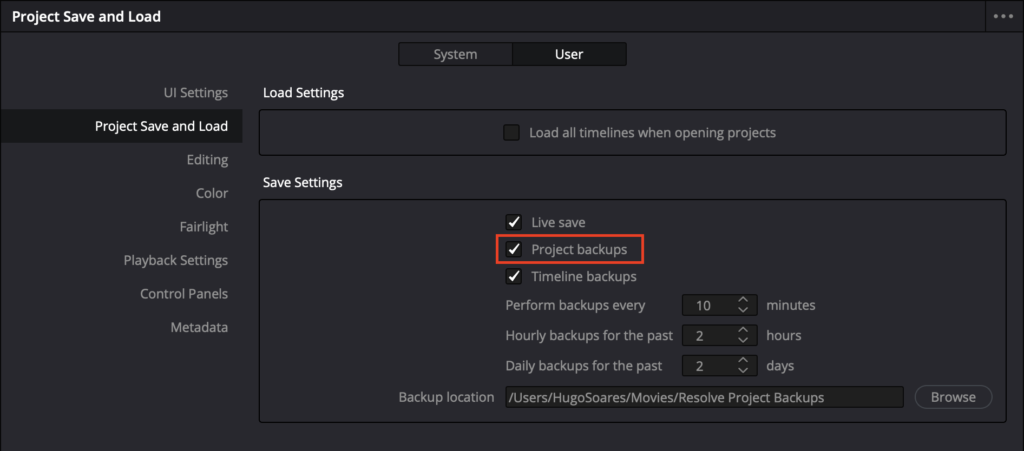
To activate Auto Project Backups, follow these steps:
- Go to the upper left corner menu and click on DaVinci Resolve.
- Go to Preferences.
- Navigate to Project Save and Load.
- Select the User tab.
- Check the Project Backups checkbox and click Save.
At the bottom of this chapter, you can watch a quick video tutorial to understand how to do this!
How do you Restore Auto Project Backups?
Blackmagic Design has a clear and reliable workflow for project recovery in DaVinci Resolve. To restore a project the proper way—exactly as Blackmagic intended—follow these steps:
- Click on the House Icon on the bottom right corner.
- Open the Project Manager.
- Locate and select your project
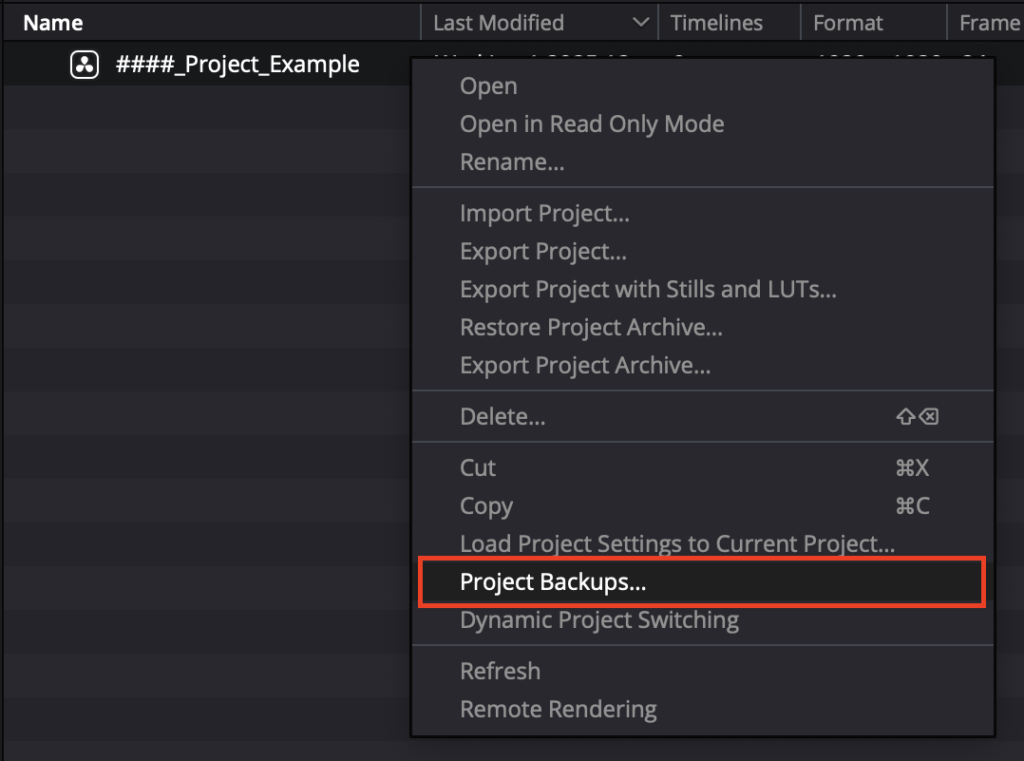
- Right-click on the project and choose Project Backups from the menu.
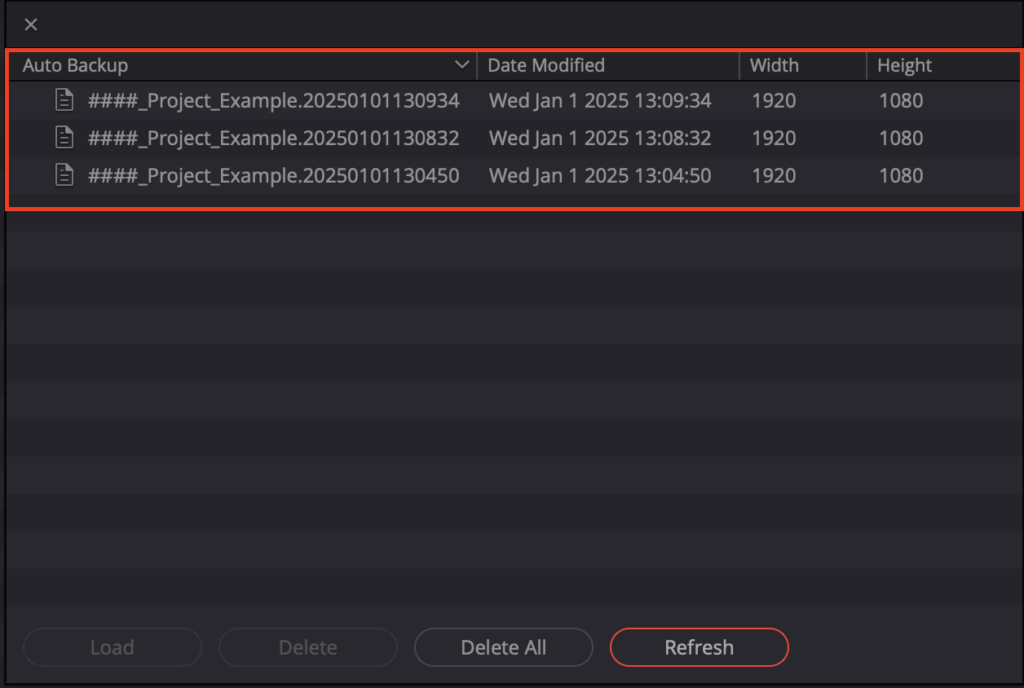
A pop-up window will appear displaying all available backups for the selected project. This is where DaVinci Resolve’s smart backup system shines.
To restore a project backup, simply select the desired version and click Load. DaVinci Resolve will create a new project in your database based on the selected backup. Importantly, this process does not overwrite your current project—instead, it generates a separate, fully restored version. Project Backups are only saved when changes have been made to a project. If DaVinci Resolve sits idle for any period of time, such as when your smart watch tells you to go outside and walk around the block, no additional project backups are saved, preventing DaVinci Resolve from overwriting useful backups with unnecessary ones.
By following this method, you ensure you’re respecting DaVinci Resolve’s intended backup workflow while keeping your original project safe and intact. At the bottom of this chapter, you can watch a quick video tutorial to understand how to do this!
Timeline Backups
How do you Activate Auto Timeline Backups?
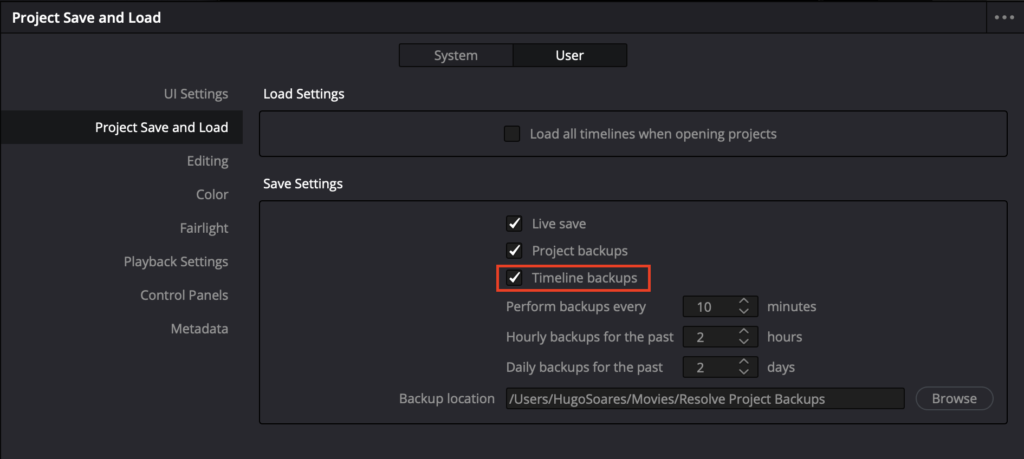
To check Auto Timeline Backups, follow these steps:
- Go to the upper left corner menu and click on DaVinci Resolve.
- Go to Preferences.
- Navigate to Project Save and Load.
- Select the User tab.
- Check the Timeline Backups checkbox and click Save.
How do you Restore Auto Timeline Backups?
First check if the Timeline Backups checkbox in the Project Save and Load panel of the User Preferences its enable.
To restore timeline backups, you need to follow these steps:
- Open the Media Pool and identify the timeline for which you want to view backups.
- Select the timeline in the Media Pool.
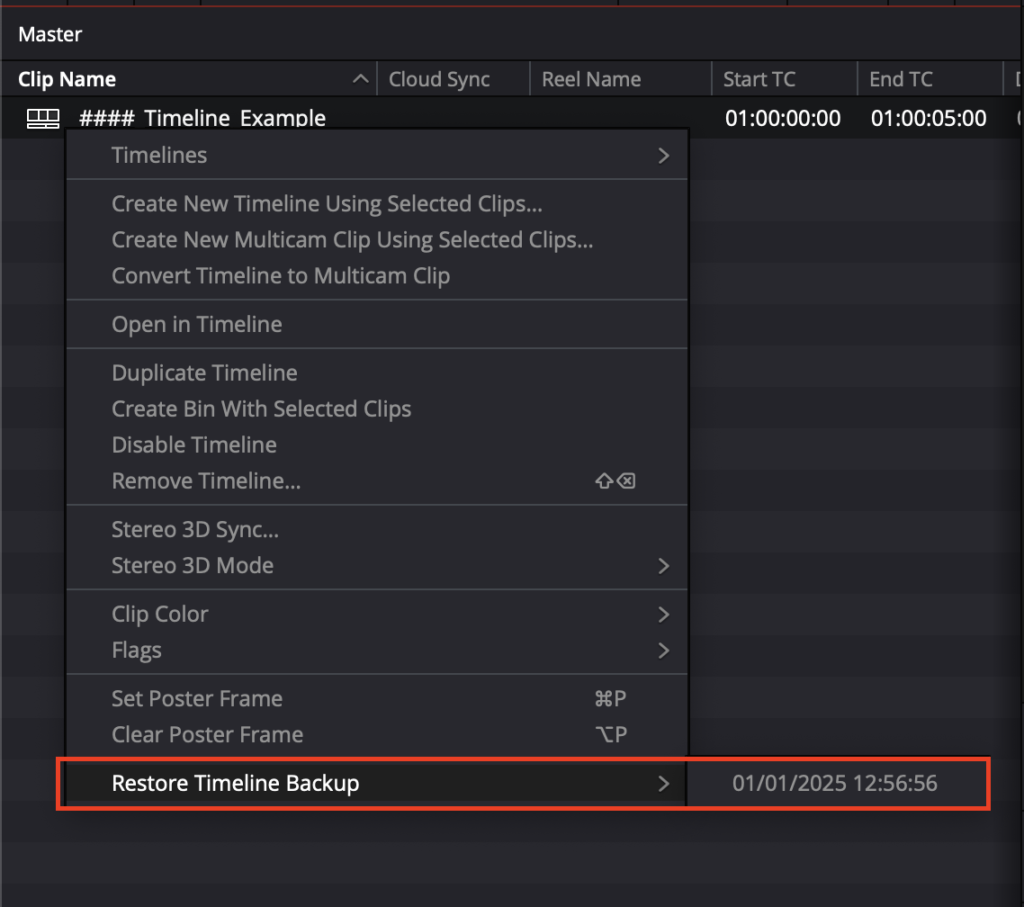
- With the timeline selected, right-click and choose “Restore Timeline Backup”. If the “Restore Timeline Backup” option does not appear, it means there are no backups available for that timeline.
- If backups are available, they will appear with their respective date and time, such 10_01_2025 22:00:32.
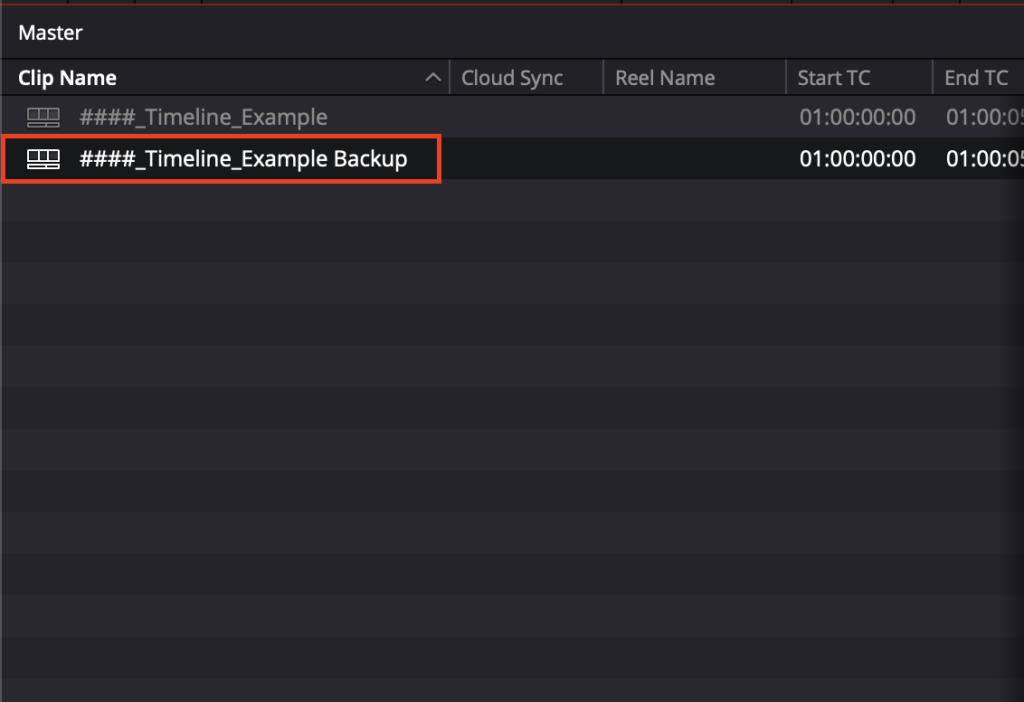
- After selecting the backup, a new timeline will be created with the same name as the original, with the word “Backup” added to the front. You can see this in the Media Pool.
If you prefer, you can check this small video where I show you how to do it.
Another feature of this type of backup, which I will explain in another chapter, is that even if a timeline is deleted, we can still have backups of that timeline and restore them.
It’s possible to Restore Timeline Backups from Deleted Timelines? Yes!
Imagine you’re working and accidentally delete a timeline from your project, and you want to restore it. You’ll try ‘Undo’ first, but if it doesn’t work, you can restore timeline Backups from deleted timelines.
Follow the steps below:
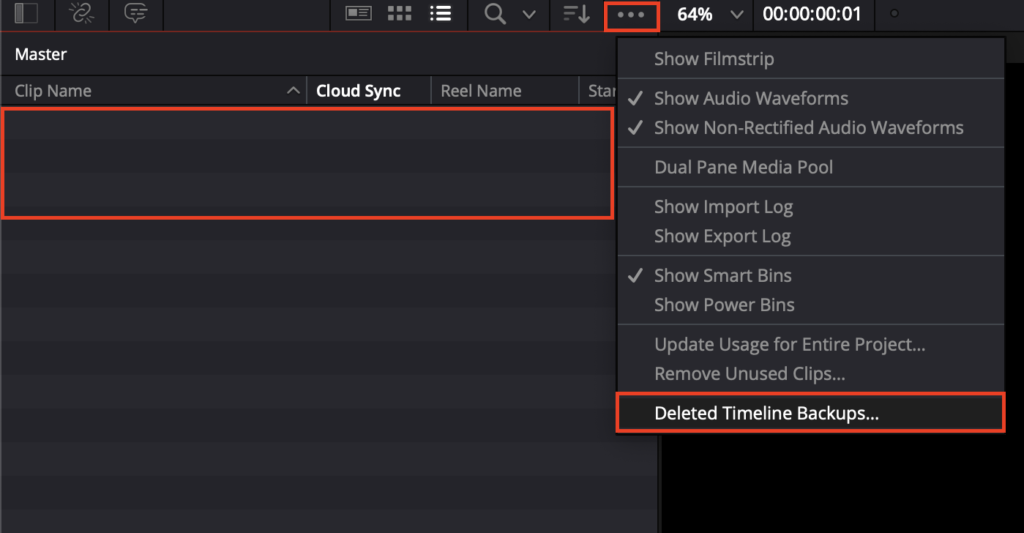
- From the Media Pool options menu, located in the three dots in the upper-right corner of the Media Pool window, select Deleted Timeline Backups.
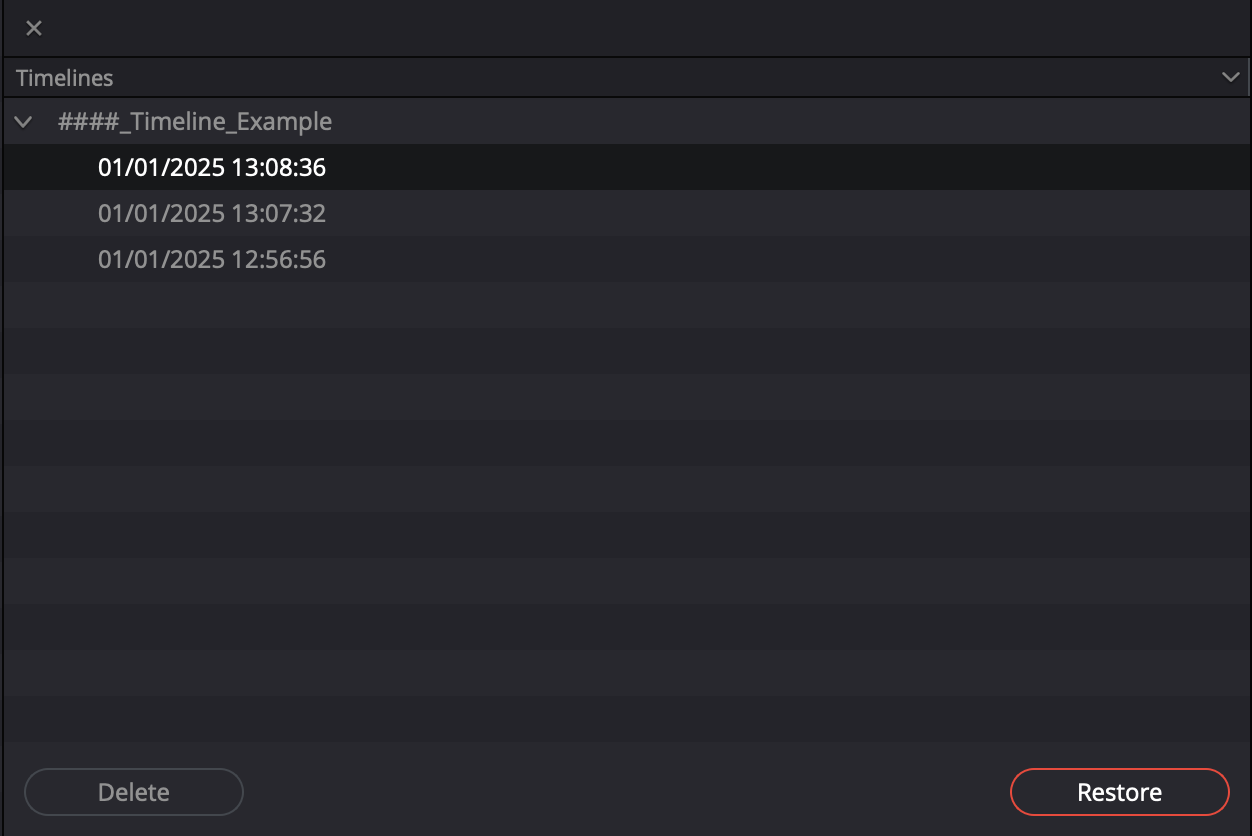
- All timeline backups from deleted timelines will appear.
- Choose the backup you want to recovery and click on Restore.
- A new timeline will be created with the same name as the original, with the word “Backup” added to the front.
Another aspect I’d neglect to mention is: this function only restores timelines, not the content within timelines. If, for example, you delete a compound clip that is being used by the timeline, but you have already deleted it from the media pool, when you restore the timeline, the compound clip will not be restored from the media pool and will appear offline.
Check this small video where I show you how to do it.

Auto Backup Save Settings Explained
Understand Auto Backups Save Settings
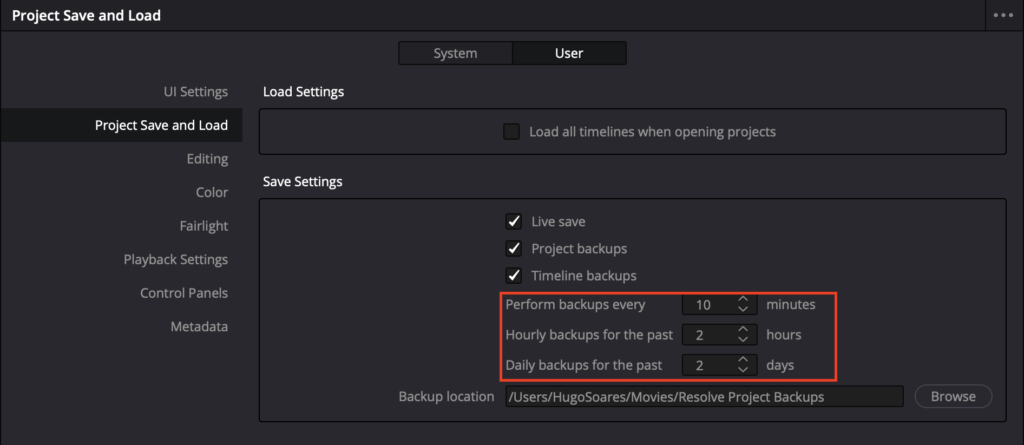
“Save Settings” is the name of the menu where you choose the parameters DaVinci Resolve takes into consideration when performing automatic Project and Timeline Backups. The concept is based on First In, First Out. As I mentioned earlier, DaVinci Resolve will automatically create and delete backups at certain times based on the save settings you choose. Let me explain how these save settings work so you won’t be surprised when something goes wrong. Let’s go over the default settings as an example:
Default Save Settings:
- Perform backups every: 10 minutes
- Hourly backups for the past: 2 hours
- Daily backups for the past: 2 days
Perform Backups Every… Last Hour of Work
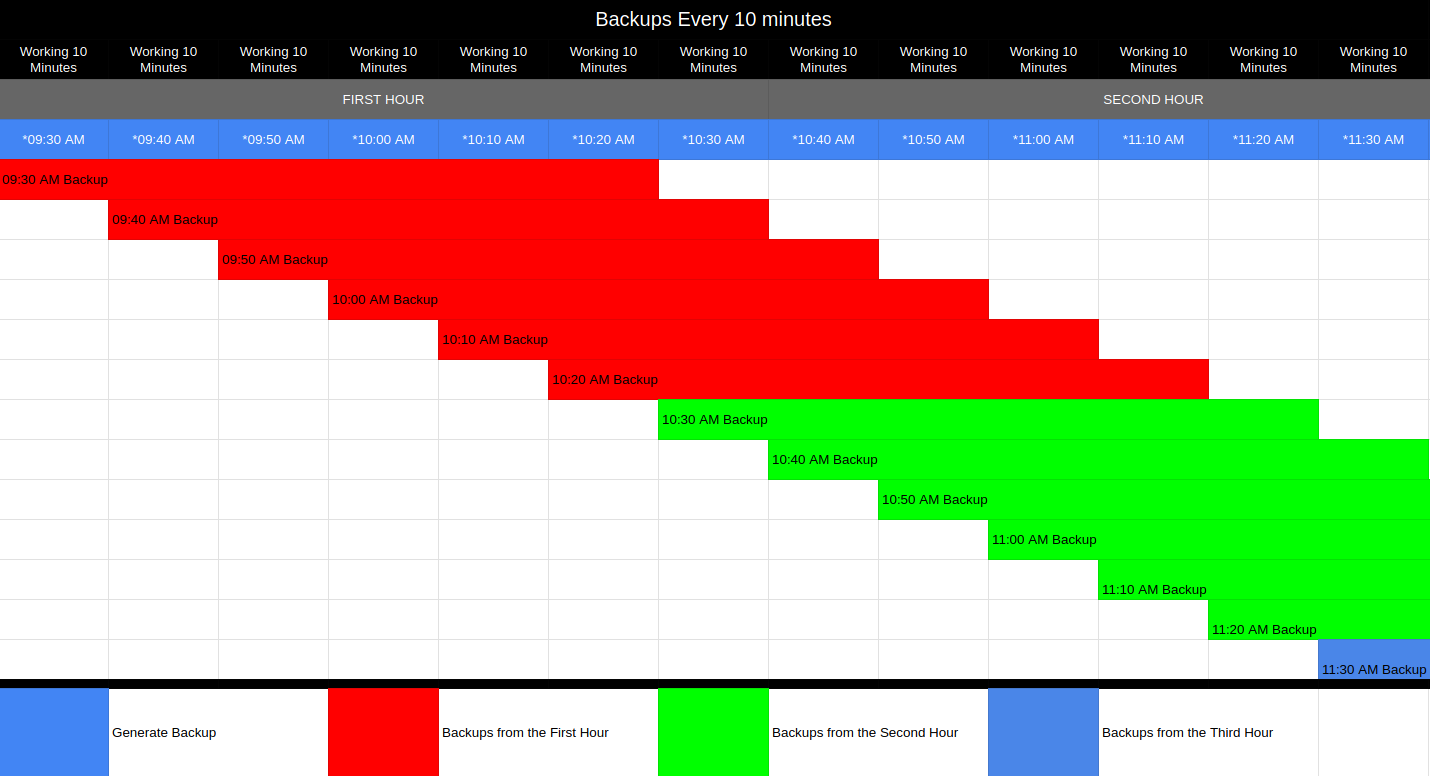
The Perform backups every function in DaVinci Resolve is designed to generate backups only for the last effective hour of work. When set to create backups every 10 minutes, the system will generate six backups within an hour of work (one every 10 minutes). However, these backups will only be available for the most recent hour of work. Backups created every 10 minutes are valid only for one hour after their creation, and the timing is not based on the clock time. Older backups are discarded once the seventh backup is created. For example, if the backups are created at 09:30, 09:40, 09:50, 10:00, 10:10, 10:20 and 10:30 the backup created at 09:30 will be discarded when the backup for 10:30 is generated. By default, this means you will only ever have six backups at a time, representing the last hour of work.
Hourly backups for the past X hours
Hourly backups will be generated for each hour of work. By default, backups will be discarded, keeping only the backups from the last 2 hours. For example, at 12:30 AM, only the backups from 11:30 AM and 10:30 AM will be available. All older backups will be discarded as new ones are created.

Daily backups for the past X days
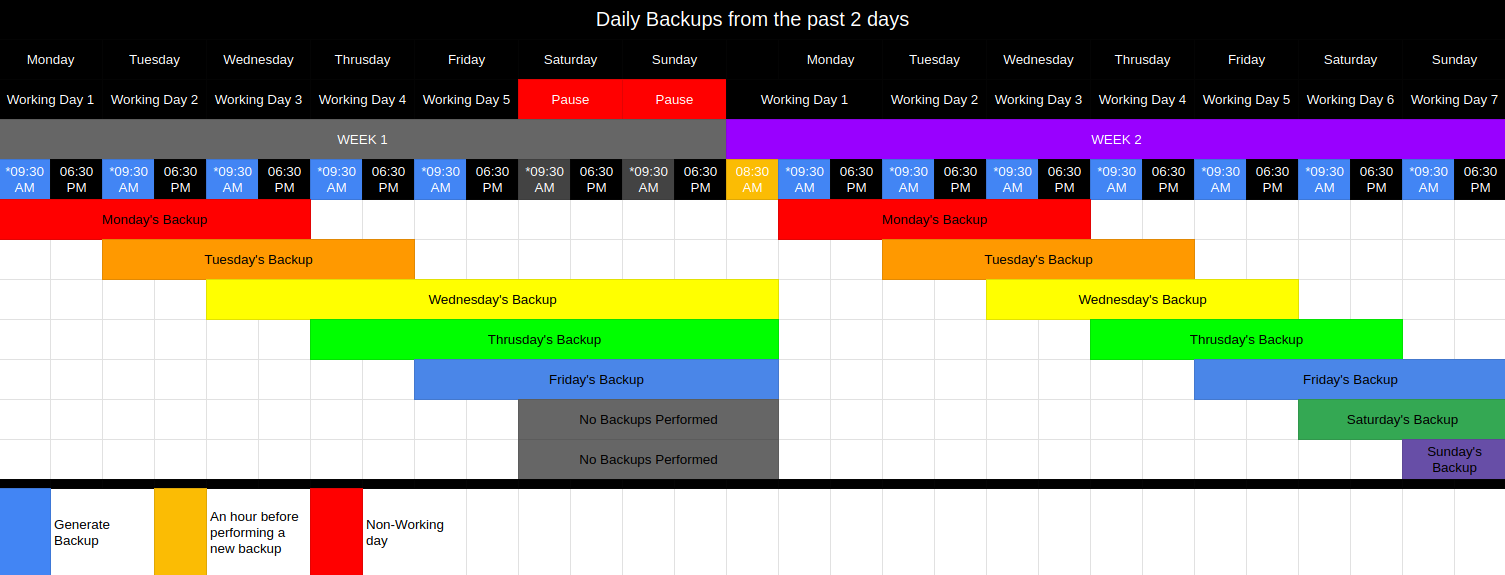
In this setting, DaVinci Resolve will create a daily Project Backup for every day of work. This file will always be the first backup of the day. By default, DaVinci keeps daily backups for the last 2 days in the past. What does this mean? For example, if today is January 18, we subtract two days from January 18, which gives us the backups from that day onwards. January 18 – 2 days = January 16, meaning we will have daily backups from January 16 and January 17. As soon as a new backup is created on January 19, the one from January 16 will be deleted. This is because on January 19, the calculation will be 19 – 2 days = January 17, so we will only have backups from January 17 onwards.
There is an exception when we stop working on the project. For example, if on January 16 we stopped working and didn’t touch the project again, and then reopen the project on January 20, we will still have the daily backups from the last two days of the last day we worked. In this case, we worked on January 16, so we will have daily backups from January 16, January 15, and January 14. Once we create the first backup on January 20, it will again calculate 20 – 2 = January 18. Normally, it would keep the backups from January 18 and January 19, but since we didn’t work on January 18 or 19, no backups were generated for those days. At the moment the new backup is created, it will delete all backups from January 14, 15, and 16. Because the project was inactive, we will essentially have no backups for the project.
What I want you to understand is that the trigger for deleting backups is when a new one is created. Therefore, it is very important when it’s the weekend, or if you haven’t opened the project in a long time, to first check everything before performing any actions in the project that generate a new auto-backup and delete the older ones.
In this table, you can see two scenarios: one where we work for 7 days, and one where we work for 5 days, as if we had stopped for the weekend. It also shows how long each backup lasts. On Monday of week number 2, for example, at 08:30 (marked in yellow), I want you to understand that at that time, you still have the backups from Friday. However, as soon as new backups are created, the older ones will be deleted.
My recommendations for Auto Backups Save Settings
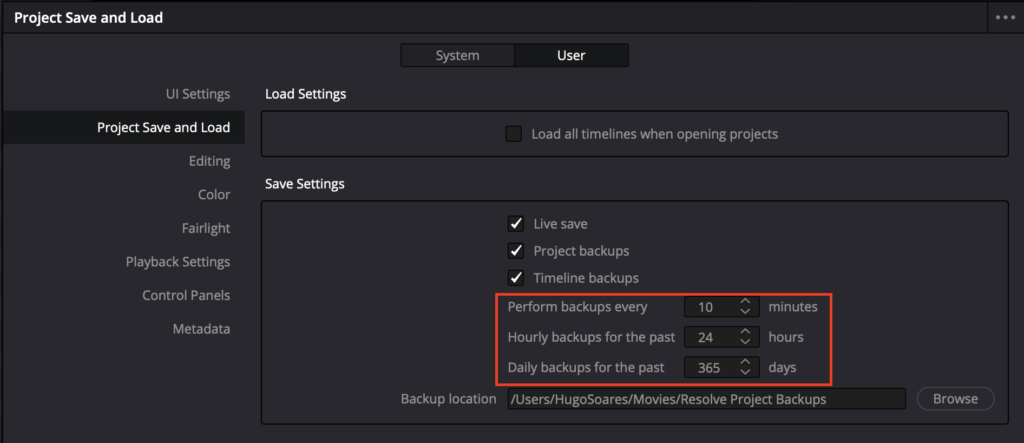
My recommendation for Save Settings is to leave hourly backups for the last 24 working hours. That way we always have all the hourly backups from the previous day and we’re much safer. If you leave it at default, on the same day, in the afternoon, you run the risk of not having the morning backup. And this is serious for me. With regard to daily backups, it’s very important for me to leave them at 365 days because for those projects that have been idle for months, we can open them a long time later and notice that something is missing. And if we have the default of 2 days, we obviously lose everything. But if we have 365 days, at that moment we can have the daily backups of some previous day and maybe recover our project.
Default Save Settings:
- Perform backups every: 10 minutes
- Hourly backups for the past: 24 hours
- Daily backups for the past: 365 days
Auto Backup Project Cycle: From Creation to Deletion
When Does DaVinci Resolve Actually Delete Auto Backups?
As soon as you open a project and make any changes in DaVinci Resolve, the program checks your save settings (e.g., performing backups every 10 minutes). It will then start creating automatic backups once 10 minutes have passed. However, if you open the project and don’t make any changes, no backup will be performed. When something new is added to the project, DaVinci Resolve begins starting the process of Auto Save. At the same time, it reviews previous backups based on your save settings, including hourly backups (keep only 2 hours from the past) and daily backups (keep only 2 days from the past). It deletes old project backups and then create a new backup using a method called First In, First Out. Backups deemed outdated based on your save settings are removed automatically.
Actions Performed on Project Backups When the Project Is Open:
- Project Open
- Start Performing Project Backups Every 10 minutes
- Checking any new actions performed, if not any new backup is performed
- Generate a new backup copy of the project if there is anything new
- Check Current Time
- Check Backup Save Settings
- Delete consider Old Project Backups Based on Save Settings.
And the cycle restarts when new backups are made after 10 minutes.

What Happens to Auto Backups When a Project Is Closed in DaVinci Resolve?
One of the most controversial issues with project backups and recording settings arises when the project is closed. Many people assume that backups are managed in real-time, counting days and hours based on the local time. For example, they might look at the current time, subtract two hours, and believe that those backups no longer exist.
However, the removal function is only activated when the project is reopened, and a new backup is created. In other words, the software does not have a background function for deleting project backups while the project is closed. For instance, if a project is closed on 03-01-2025 and there are backups from the 2nd and 1st of January, those backups will still be available when the project is reopened on January 25th. However, as soon as a change is made to the project, it will generate new backups and then delete the old ones. It’s important to think in terms of software programming instructions: DaVinci Resolve can only create or delete backups while the project is open. If you stop working on a project, the backups will remain unchanged, as there is no background process to delete them while the project is closed. However, when you reopen the project after some time, DaVinci Resolve will create a new backup based on the current time. This action will cause Resolve to check the backup recording settings, compare the current time with the existing copies and delete those that are no longer within the retention period configured in the recording settings.
Actions Performed on Project Backups When the Project Is Close:
- Project Closed
- The backups available at the moment you close the project remain intact.
- No background deletion or creation occurs.
- Project Reopened
- Backups remain unchanged until the project is reopened and a new action is performed, which triggers DaVinci Resolve to create the first auto-backup. After this, DaVinci Resolve begins the cycle of creating and deleting backups.
Project/Timeline Backups location
Where are Project and Timeline Backups Stored Outside of DaVinci Resolve?
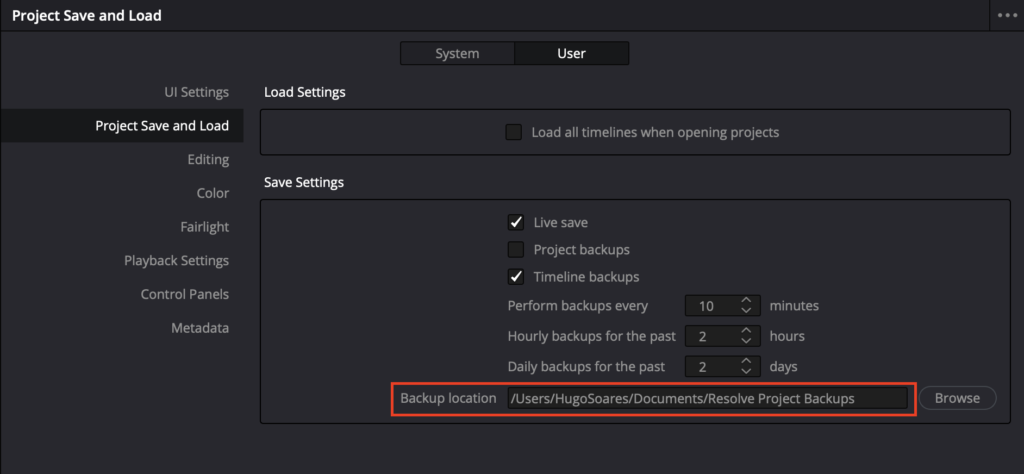
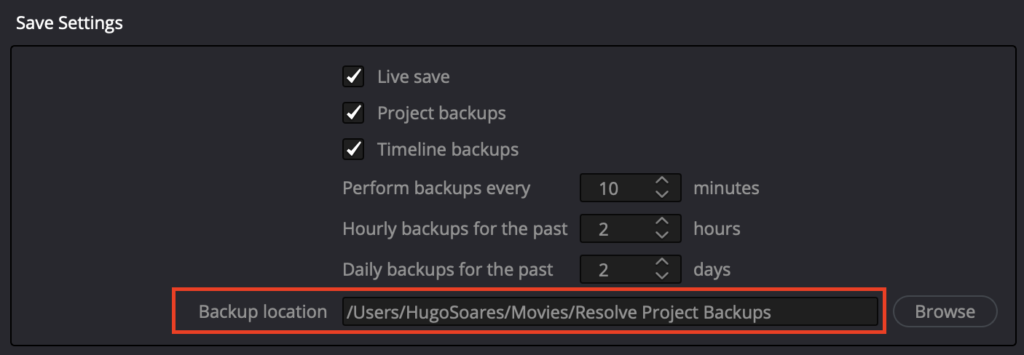
As mentioned in the last chapters, the Project and Timeline Backups location is defined under Project Save and Load in the Save Settings menu. By default, the backup location is set up in the same directory as defined in Media Storage Locations. The first media storage location selected is where Resolve will create a folder inside that path named Resolve Project Backups and store backups there. Below is the path for the various operating systems:
MacOs System
Default Config
- Media Store Location
Macintosh HD/Users/HugoSoares/Movies - Project Backup Location
Macintosh HD/Users/HugoSoares/Movies/Resolve Project Backups
Windows System
Default Config
- Media Store Location
C:\Users\HugoSoares\Videos - Project Backup Location
C:\Users\HugoSoares\Videos\Resolve Project Backups
Linux System
Default Config
- Media Store Location
/Home/HugoSoares/Videos - Project Backup Location
/Home/HugoSoares/Videos/Resolve Project Backups

If you want to confirm your location, go to Project Save and Load and check the Backup location. Please don’t change this path now until you read the next topic, which explains how to change the project backup location without losing previously performed backups.
If you want to change the project backup location to another folder or disk, you can simply update the location in the settings. Be aware that if you change the project location, backups stored in the previous location will not be copied automatically. To learn how to change the location properly while keeping all backups, refer to the chapter “Changing Project Backup Location Without Losing Any Backups.”
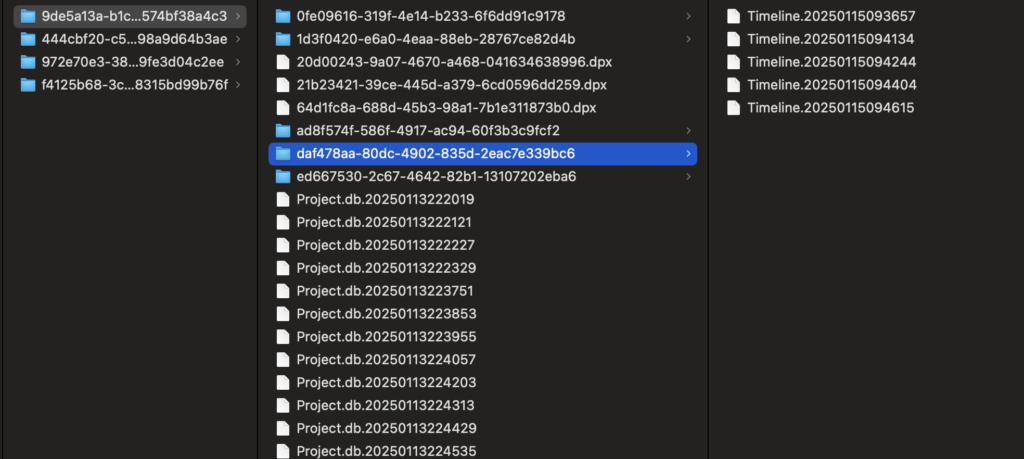
How are Project Backups organized? Many people find this confusing because the backups appear as coded files. Read the next chapter to understand what these codes mean and how to interpret them.
What Are the Coded Folder Names in the Backup Folders?
Almost everyone tries to go to the Backup Local manually and recover the project, but then encounters folders with strange codes and realizes that it’s very difficult to know which folder corresponds to which project. Here’s an explanation of why the folders are set up with these strange codes. The big problem is that people try to find their project name by looking at these codes, but it’s not possible to identify the project name just by looking at the code. There’s another way. Before we explain what this code is, let me provide some context. As soon as you create a project in your database, it generates a Unique ID for the new project. This is the number that appears in the folder names. This unique code is a combination of letters and numbers, and it represents the project’s ID. No other project will have the same ID.
For example: “2efaa3e2-f56d-417f-8128-bf709f522ed4”.
Most people don’t need to understand these numbers because DaVinci Resolve provides an easy way to access Project Backups, as I explained earlier. However, users often move to the next step trying to bypass Resolve when, during the backup process, the project doesn’t appear in the pop-up window.
Structure of Folders Inside Resolve Project Backups
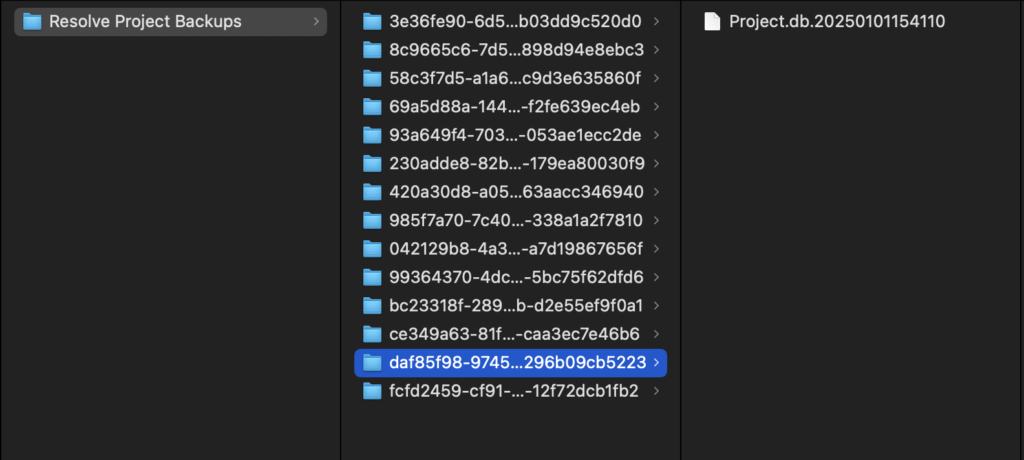
Backups have a specific structure that must be maintained for them to function properly and be readable by DaVinci Resolve. If the structure is altered, the backups may not be correctly recognized by the software. The parent folder must always retain the same name in order to be identified by DaVinci Resolve. The “Resolve Project Backups” folder is where the backups are stored.
Inside this main folder, each project has its own subfolder with a unique ID, which corresponds to the ID of the project created and generated by a specific database. Within these project folders, you’ll find the project.db files, which represent the backups. More recently, additional folders have been introduced, each containing the Timeline ID. These folders house the timeline backups, which are stored in the format of Timeline.dayhour.
The structure is illustrated below.
Resolve Project Backups
Project Unique ID
daf85f98-97451320423nfo2f2
Project.db.DateHour
Project.db.20250101154110
Timeline Unique ID
daf85f98-97451320423nfo2f2
Timeline.DateHour
Timeline.20250101154110

Changing the Project Backup Location Without Losing Any Backups
Imagine you set up your project backups to a specific disk. Later, you decide to move them to another folder or even another disk. Here’s something important to understand: if you are working on 100 projects at the location User/X and you change the backup location to User/Y, when you open the project backups dialog box, you will not see any backups stored for the 100 projects. To manage backups in the new location without losing your previous backups, it’s essential to understand how the system works. To change your project backup location without losing any backups made up to that point, you will need to go to your current project backup location path, for example: /Users/HugoSoares/Movies/Resolve Project Backups.

Project Location A
- Go to the path of your current backup location:
- Users/Movies/My_Backups_A/Resolve Project Backups
New Location
- Go to the path of your current backup location:
- Users/Movies/NewLocation/
- Copy the folder Resolve Project Backups
- Past the folder Resolve Project Backups on the new location
- Users/Movies/NewLocation/ Resolve Project Backups
- Go to Project Save and Load, on Backup Location and the connect your new backup folder to resolve. Select the folder “New Location”. Click on Save, click on browser on Project Save and Load, on location, and select the path User/Desktop/NewBackupfolder/.
- Go to Project Manager, click on a project you have already backed up, and check if there are project backups available at the new location.
To ensure a secure backup, you must make sure that you open the project backups within the same database and only move the folder’s location. It will not work to transfer the project from one database to another and try to place the backups of that project in the new database. This is not possible because the Unique ID of the new project will be different.
Warning!
Deleting a project from the database also deletes its backups!
The first impression I had a few years ago was that I would always be safe because the resolver had auto backups, but in reality, after realizing that if I didn’t have any database backups or a drp file outside the resolver, if I deleted the project for any reason, there would be no way of recovering it. You can see for yourself in this video. And it makes perfect sense to keep the machine’s storage healthy and not have backups of projects we’re not using, but by accident and human error, we can lose everything if we’re not careful.
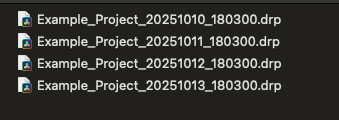
To avoid that: Export your project in drp. regularly
The best way to protect your work is to export your project at least once or twice a day. This way, if you accidentally delete the project, you’ll still have the exported version to import and avoid losing everything. I highly recommend adopting this practice, especially when working with multiple people or in a small team using a local database. It’s a small step that can save you a lot of heartache later on.
My notes and Recommendations!
Overall, I believe you now have a broad understanding of the backup system you can implement to protect your projects. However, I’ve covered here all the techniques you can use without relying on external automatic backup applications. In summary, in my opinion, to stay as secure as possible, you should:
- Enable Project and Timeline Backups
- Set your save settings to back up every 24 hours and keep 365 days of history
- Perform a daily backup in .drp format for your project
- Back up your database at least once every two weeks
- Upload the .drp files and the resolve.disk.db file to the cloud
By following these steps, you’ll be protected from crashes thanks to DaVinci Resolve’s live save feature. You’ll also guard against human errors, like accidentally deleting your project, by having the .drp backups. And by storing everything in the cloud, you ensure that even if something happens to your physical computer or location, your data is still safe.
I hope you enjoyed the article, and I’m always open to discussing these topics further or answering any questions. Share your thoughts in the comments below — we’d love to hear from you!
Thank you, and until the next article,
Hugo Soares
- hugosoarescolorist@gmail.com
